This guide helps you create a Microsoft Entra App: register an application in Microsoft Entra ID, get the Client ID and Tenant ID, and create a Client Secret Value. These are the credentials you use when you configure a connection to systems that support this method, including Microsoft Dynamics 365 Finance & Operations and Microsoft Dynamics 365 Business Central on HexaSync Automation Engine.
If you already have a suitable Microsoft Entra App, you can reuse it instead of creating a new application. Before you continue, check the tenant, the credentials and the authorization requirements of the system you want to connect.
Before you start
- A Microsoft Entra account with permission to create App registrations in the tenant you want to connect.
- Access to the correct Microsoft Entra tenant of your organization.
Part 1: Create a Microsoft Entra App
Step 1: Sign in and select the correct tenant
- Open the Microsoft Entra admin center.
- Sign in with an account that has permission to create App registrations.
- If the account belongs to several tenants, switch to the tenant of the organization you want to connect.
Step 2: Create an App registration
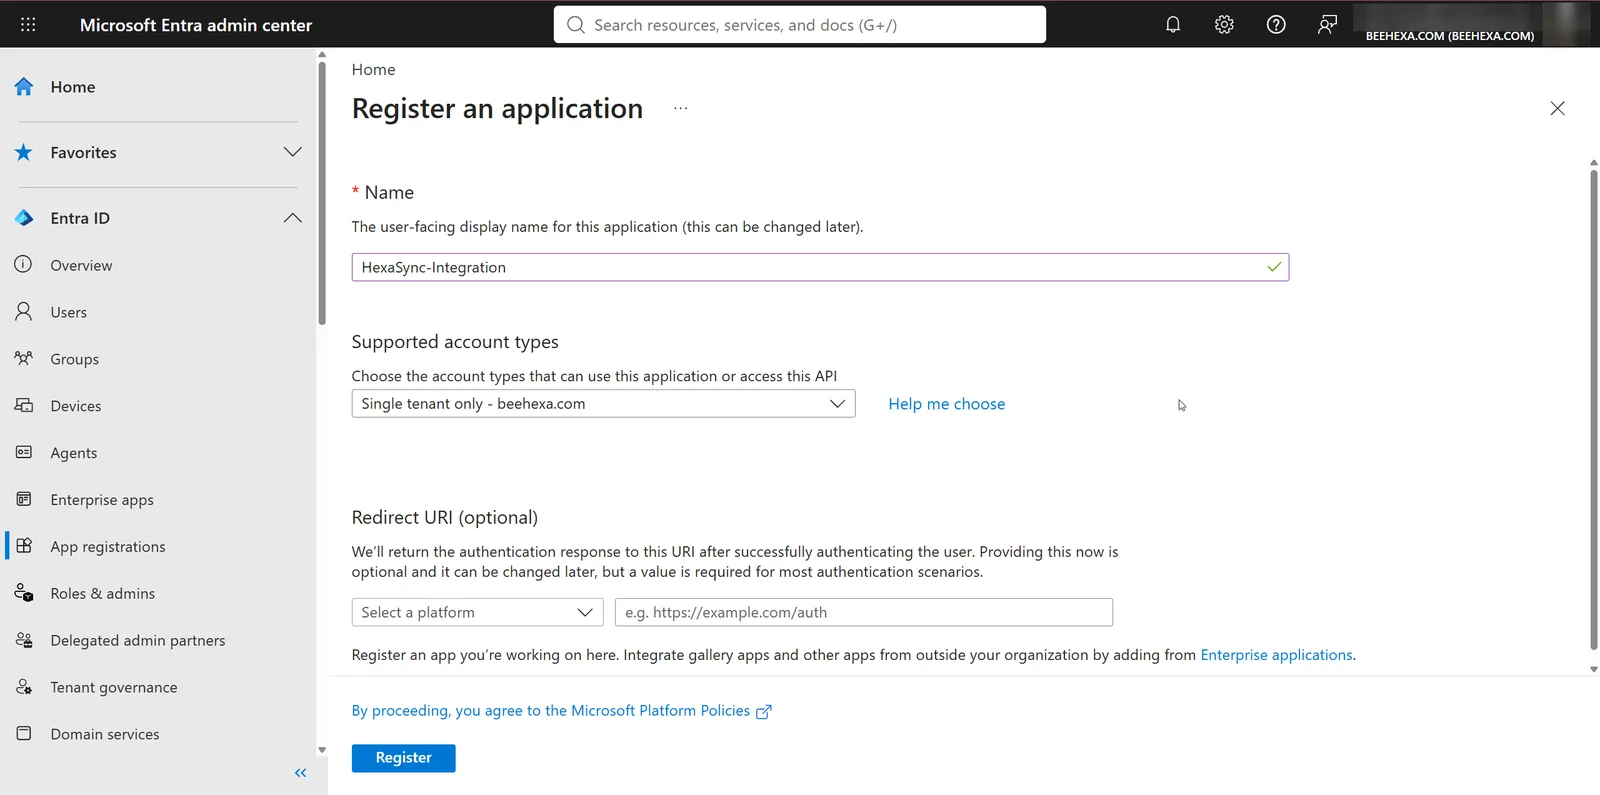
- Open Entra ID → App registrations, then select New registration.
- Enter the application details from the table below.
| Field | Value to enter or select |
|---|---|
| Name | A name that is easy to recognize, for example HexaSync Integration. |
| Supported account types | Single tenant (Accounts in this organizational directory only). |
| Redirect URI | Leave empty. |
- Select Register.
Official reference: How to register an app in Microsoft Entra ID
Step 3: Get the Client ID and Tenant ID
- In the App registration you just created, open Overview and copy the following values:
| In Microsoft Entra | Information to save |
|---|---|
| Application (client) ID | Client ID |
| Directory (tenant) ID | Tenant ID |
Note: Application (client) ID is different from Object ID.
Step 4: Create a Client Secret
- In the application, open Certificates & secrets → Client secrets.
- Select New client secret.
- Enter a Description, for example HexaSync credential, then choose the lifetime under Expires.
- Select Add, then copy the value in the Value column right away.
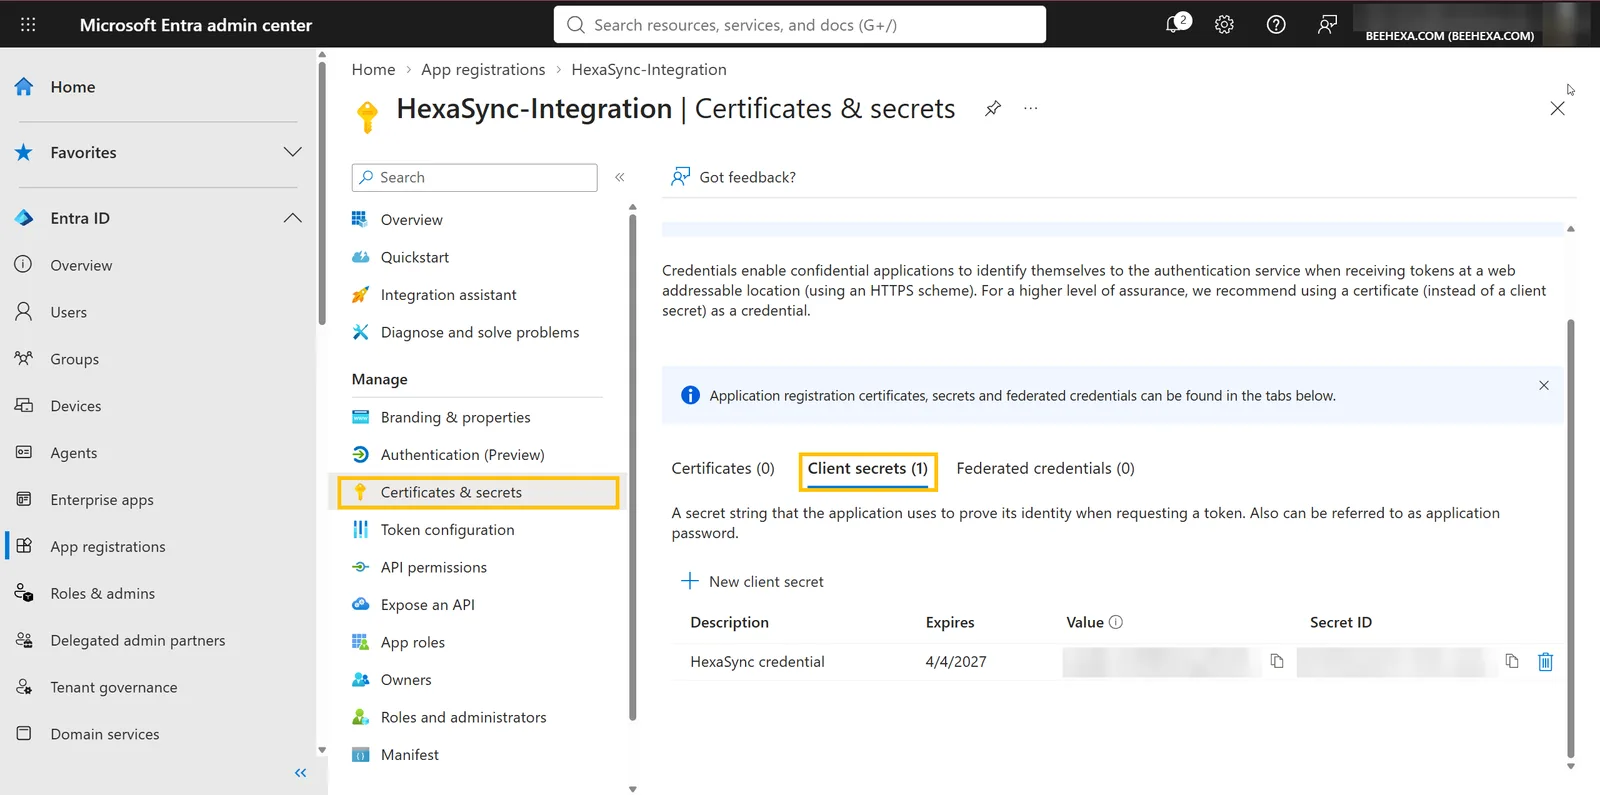
Note: Use the Client Secret Value, not the Secret ID. The Value is shown only when the secret is created, so store it safely and write down the expiration date.
Check the information you created
- You have the Application (client) ID to use as the Client ID.
- You have the Directory (tenant) ID to use as the Tenant ID.
- You have saved the Client Secret Value and its expiration date.
Part 2: Authorize access for the system you want to connect
After you create the Microsoft Entra App, check the authorization requirements of the system you want to connect. API permissions, Admin consent and permissions in the target system differ from one system to another. The two sections below apply to Dynamics 365 F&O and Business Central; when you connect another product, use the requirements of that product.
Microsoft Dynamics 365 Finance & Operations (F&O)
For F&O, access is granted by linking the Microsoft Entra App to an integration user in F&O and assigning suitable security roles to that user. You do not need to add a general API permission in Microsoft Entra ID at this step. When it calls the API, the application works with the permissions of the linked user.
Prepare the integration user
Use a dedicated user for the integration, for example hexasync.integration. If the user already exists in F&O, go to the section on assigning security roles.
- In the Microsoft Entra admin center, open Entra ID → Users, then select New user → Create new user.
- Enter the User principal name, for example hexasync.integration@yourcompany.com, and the Display name, set a password, select Account enabled, then select Review + create → Create.
- In F&O, open System administration → Users → Users, select Import users, select the account you just created, then select Import users → Close.
- Open the imported user and check the User ID and Company.
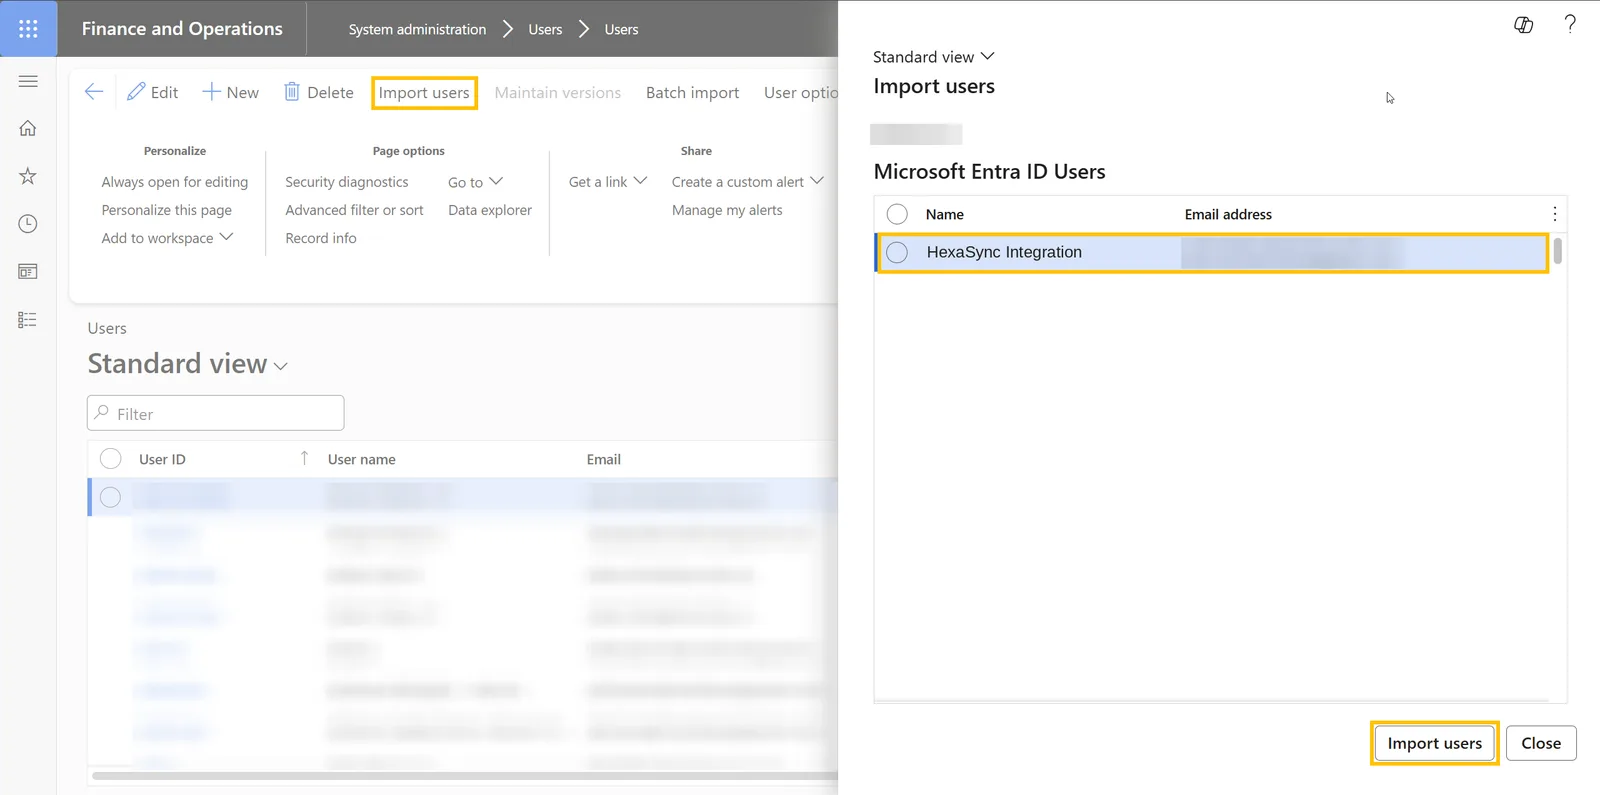
Note: The user needs a suitable license to connect to F&O and read data from it.
Assign security roles
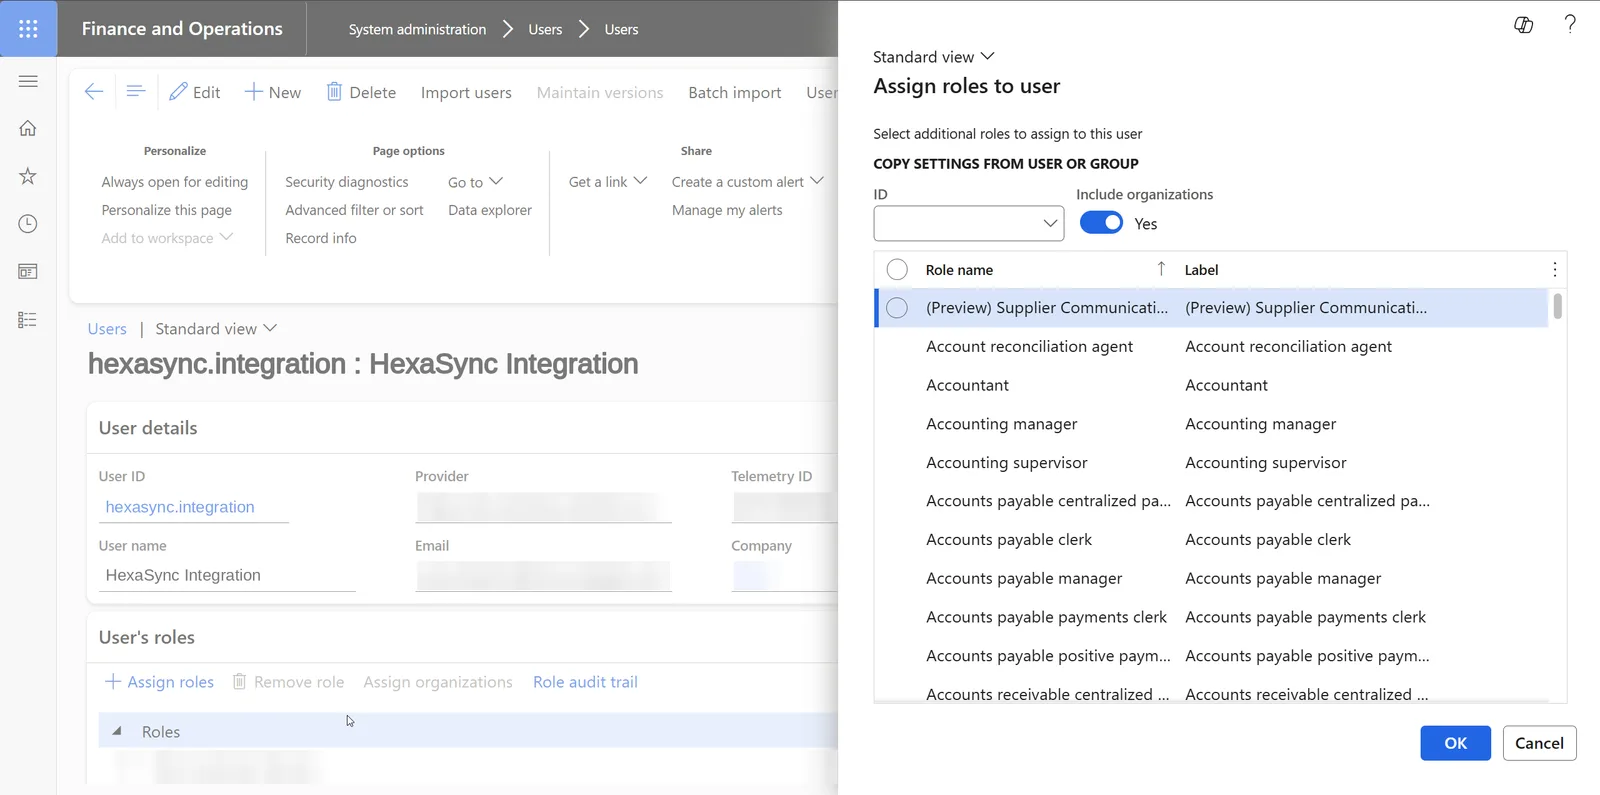
- In F&O, open System administration → Users → Users and open the integration user.
- In Assign roles to user, select the roles that match the data and APIs the user needs to access, then select OK.
Link the Entra App to the integration user
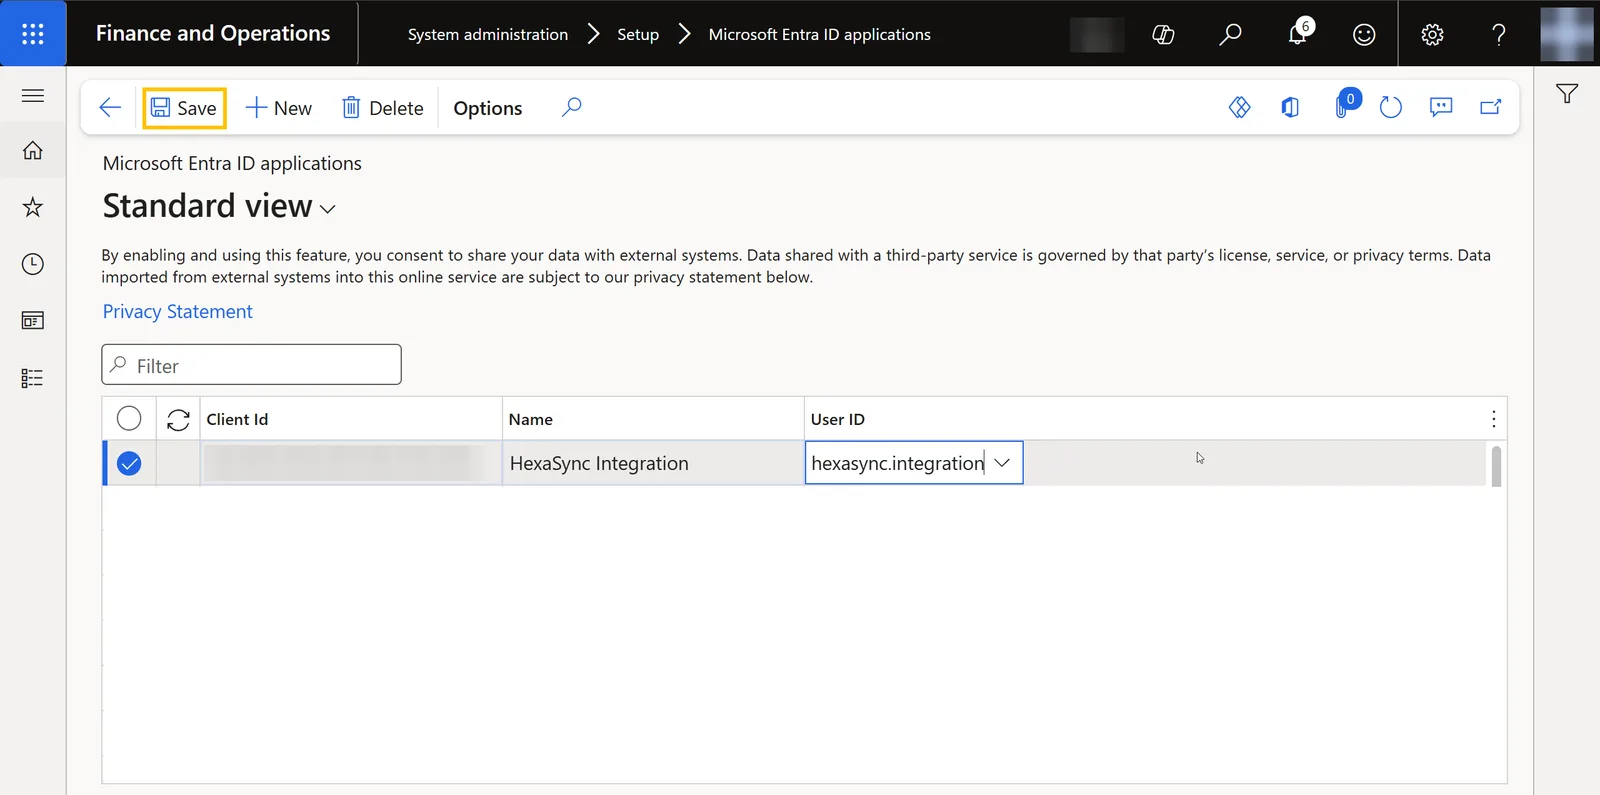
- In F&O, open System administration → Setup → Microsoft Entra ID applications, then select New.
- Enter the Client Id (the Application (client) ID of the App), the Name and the User ID of the integration user.
- Select Save.
The scope of the permissions depends on the services and data in use. Continue the connection with the guide to connecting Microsoft Dynamics 365 F&O on HexaSync.
Microsoft Dynamics 365 Business Central
For Business Central, you need to add an Application permission in Microsoft Entra ID and Grant admin consent before you register the application in Business Central.
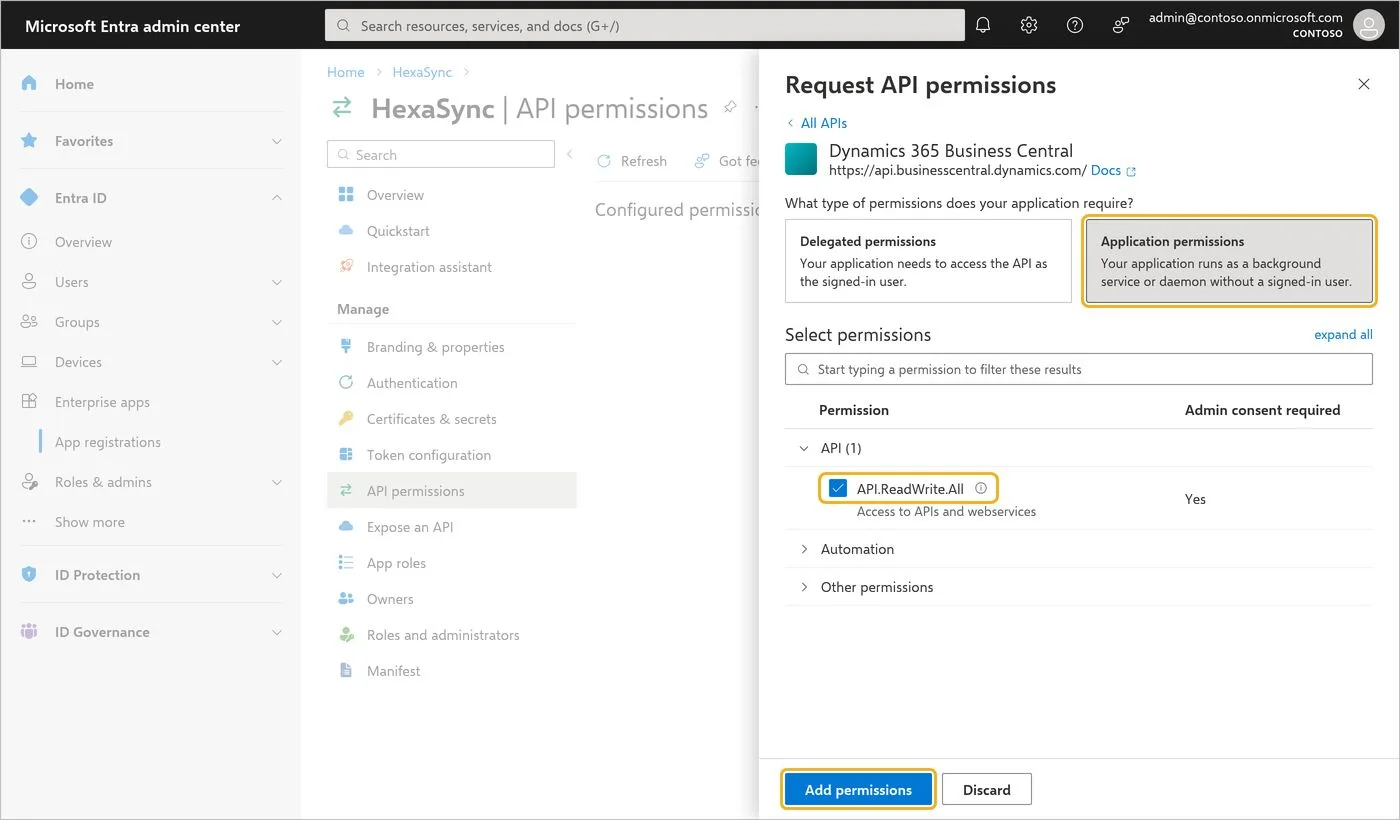
- In the App registration, open API permissions and select Add a permission.
- Select Dynamics 365 Business Central → Application permissions → API.ReadWrite.All, then select Add permissions.
- Select Grant admin consent for [organization name], confirm with Yes and check that Status shows Granted for [organization name].
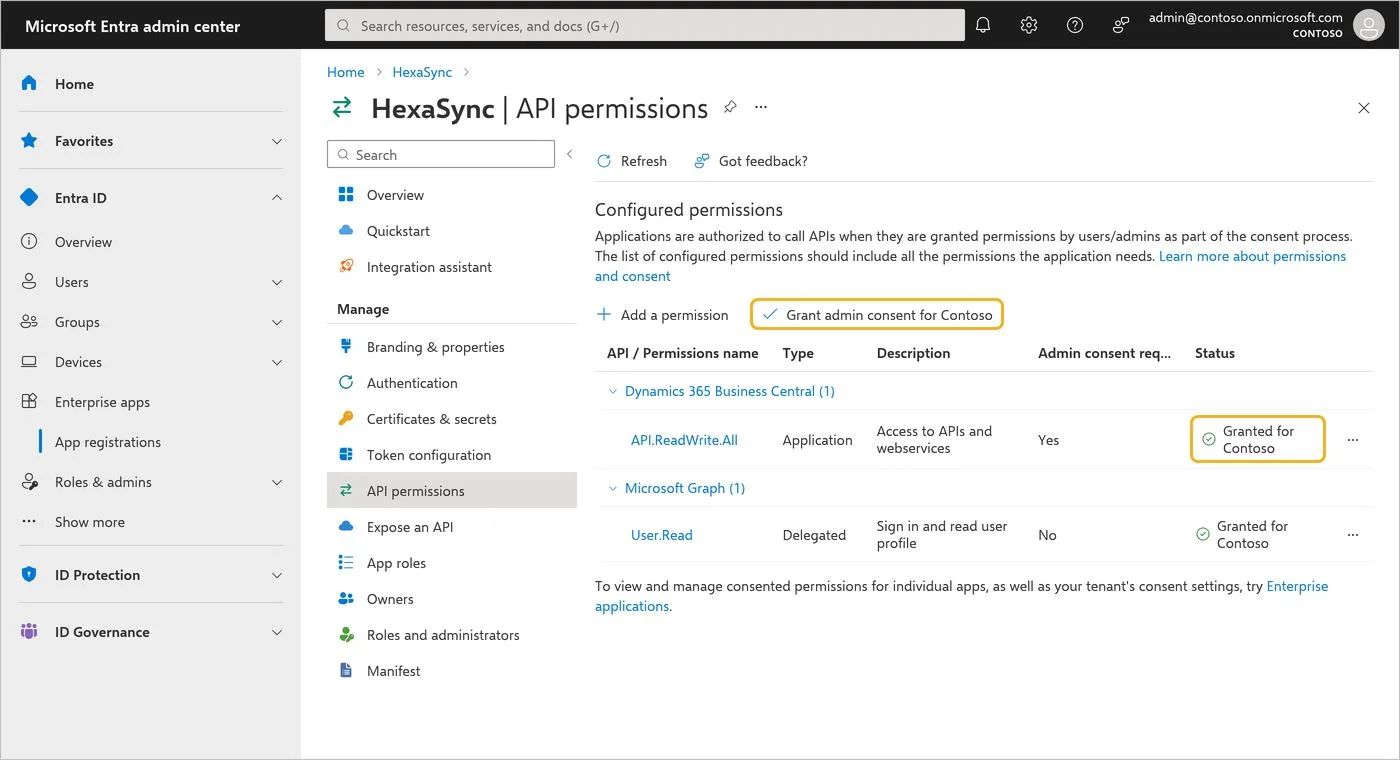
Note: API.ReadWrite.All is the permission recommended for the current Business Central Connector. It is not the only permission that works in every case. A lower permission must be confirmed as suitable for the APIs and data in use.
- Then, in Business Central, open Microsoft Entra Applications, register the Client ID, set State to Enabled and add the Permission Set D365 AUTOMATION. The configuration and checking steps in Business Central are described in the guide to connecting Business Central on HexaSync.
Part 3: Next steps
- Connect F&O: continue with the guide to getting started with Dynamics 365 F&O on HexaSync.
- Connect Business Central: continue with the guide to getting started with Dynamics 365 Business Central on HexaSync.
- Connect another system: apply the authorization requirements of that system before you use the Client ID, Tenant ID and Client Secret Value.
Part 4: Frequently asked questions
Can I reuse an existing Microsoft Entra App?
Yes. If the App already fits the tenant and the connection flow you need, you can reuse it. Check the Client ID, Tenant ID, Client Secret Value and the required API permissions before you continue.
Is the Client ID the same as the Object ID?
No. The Client ID is the Application (client) ID value in the Overview of the App registration. Do not use the Object ID in place of the Client ID.
Should I save the Secret ID or the Client Secret Value?
Save the Client Secret Value. The Secret ID cannot replace the Value. Because the Value is shown only when the secret is created, copy it and store it safely at that moment.
Is Dynamics 365 connected to HexaSync once the Entra App is created?
Not yet. You still need to authorize access for the system you want to connect (F&O or Business Central), then complete the connection flow and create a Connector App on HexaSync.