This guide explains how to connect Acumatica ERP to HexaSync for the first time, check the data after connecting, and re-authorize when needed. When you finish, you will have an Acumatica Connector App that you can use to check inventory data before you connect to another system.
Before you start
In HexaSync, a Connector App is an app that connects to Acumatica ERP. HexaSync connects through a Connected Application that you create on your Acumatica instance (your company’s own Acumatica system, reached through its own web address) and signs in with OAuth 2.0. See also the official Acumatica documentation.
- A Beehexa account to sign in to HexaSync Automation Engine. If you do not have one yet, sign up on the same page.
- Acumatica instance address: the address you use to open Acumatica, starting with
https://, for examplehttps://acme.acumatica.com. - An Acumatica user who can open Connected Applications (SM303010), usually an Acumatica administrator.
- An Acumatica account with permission to view stock items and inventory by warehouse. HexaSync will have the same permissions as the account used to authorize; you can use the same account as above.
- An Acumatica license that allows API use. If you are on a trial, sign out of other apps that are connected to Acumatica before you start.
Security note: The Client Secret is as sensitive as a password. Enter the Client Secret only on the HexaSync authorization screen.
Part 1: Authorize the Acumatica connection on HexaSync
Step 1: Sign in to HexaSync
- Go to HexaSync Automation Engine and sign in with your Beehexa account.
Step 2: Start connecting Acumatica
- Open the Acumatica connection setup page on HexaSync.
- On the Check connection details screen, on the Acumatica card that shows Not connected, select Connect.
- If you have connected this instance before: the Connected Application is already selected on the Choose an app to connect to Acumatica screen. Select Continue, then go to Step 6.
- If this is the first time you connect: HexaSync shows the Connect HexaSync to your Acumatica instance screen. Keep this screen open and complete Step 3, Step 4 and Step 5 in Acumatica in another tab.
Step 3: Create a Connected Application in Acumatica
- Open a new tab, sign in to Acumatica and select the company (tenant) that HexaSync needs to read data from.
- Type
SM303010in the Search box, or open Integration › Preferences › Connected Applications, then select + (Add New Record). - In Client Name, enter HexaSync. Keep Active selected. In Flow, select Authorization Code.
- In the Refresh Tokens section, set Mode to Sliding Expiration and select Infinite.
- Open the Secrets tab, select Add Shared Secret, enter HexaSync as the Description and leave Expires On (UTC) empty.
- Copy the Value right away, because Acumatica shows this value only once. After you copy it, select OK.
- Open the Redirect URIs tab, select + (Add Row) and paste exactly the value below, with no spaces and no trailing
/:
https://app.hexasync.com/callback/install/third-partyNote:
- Do not select No Refresh Tokens: HexaSync cannot keep the connection alive without a refresh token.
- Acumatica shows the Value of the shared secret only once. If you did not copy it, create a new shared secret.
Step 4: Save and copy the Client ID
- Select the Save button on the toolbar.
- Acumatica fills in the Client ID automatically, for example
1A2B3C4D-0000-4000-8000-ACME00000001@Company. Copy the whole value, including the part after the@sign.
Note: The Client ID box may not show the whole part after the
@sign. Click in the box and select all of its content before you copy.
Step 5: Enter the details in HexaSync
- Go back to the authorization screen on HexaSync.
- In Instance URL, enter the instance address. In Client ID, paste the value you just copied. In Client Secret, paste the Value of the shared secret.
- In Webhook Secret (optional):
- If you choose to set up a webhook in Step 9, create a secret string of your own, for example a random string from a password manager, and enter it in this box. Store this string in a safe place. HexaSync does not show this value again and you need it in Step 9.
- If you do not use a webhook, leave this box empty.
- Select Continue.
Step 6: Sign in to Acumatica and allow access
- The You’re about to authorize HexaSync on Acumatica screen shows the instance that will open. Select Continue to Acumatica.
- Sign in to Acumatica with a user who can view stock items and inventory. HexaSync has the same permissions as this user.
- When Acumatica asks, select Yes, Allow. Acumatica takes you back to HexaSync to complete the connection.
Note: If Acumatica does not ask you to sign in, Acumatica automatically uses the account that is already signed in to Acumatica. To use a different user, sign out of Acumatica in that tab before this step.
- When HexaSync shows Connected — Save Your HexaSync Webhook URL, copy the Webhook URL on the screen and save it for Step 9, then select Continue.
Step 7: Create the Acumatica Connector
- When the Acumatica card changes to Connected, select Create Acumatica Connector.
- On the Enter Connector Name screen, the default name is [Instance address] Acumatica Connector, for example
[acme.acumatica.com] Acumatica Connector. The Description is already filled in. - Select Continue. HexaSync shows Creating Connector… while it creates the Connector App; this can take a few minutes.
When the Connector App is created, the system takes you to the new Acumatica Connector App automatically.
Step 8: Check the Connector App on HexaSync
Open the Connector Apps list and select the Acumatica Connector App you just created.
Check the connection details
- In the Connector App you just created, go to Settings. The Acumatica connection details have the status Connected.
Check the data
- Open the [Acumatica] Stock Item Warehouse Details task. The task gets the quantity on hand (Qty On Hand) of each stock item in each warehouse, once an hour, and only gets stock items that have changed again.
- Wait for the task to run, or run the task yourself. Checking and showing the results takes up to 30 minutes.
- Compare a few stock items with Acumatica, for example the Inventory ID, the warehouse and the quantity on hand.
Note: HexaSync only reads data and changes nothing in Acumatica.
Step 9: Set up the webhook
A webhook lets Acumatica send data to HexaSync by itself as soon as the data changes. To set it up, you create the following in Acumatica:
- Generic Inquiry (GI): selects the Acumatica data to track.
- Push Notification: sends the GI data to HexaSync when the data changes.
Before you start, prepare:
- The Webhook URL you saved in Step 6. If you did not save it, re-authorize as described in Part 2.
- The Webhook Secret you entered in Step 5, if any.
- A Generic Inquiry (GI) that contains the data to track. A Push Notification can only send data that is in a GI, so you need to create the GI first.
- An Acumatica user who can open Generic Inquiry (SM208000) and Push Notifications (SM302000), usually an Acumatica administrator.
The example below creates a GI that sends the quantity on hand of each item by warehouse. Follow the steps in Create a Generic Inquiry and Create a Push Notification with the following values.
Create a Generic Inquiry
-
Type
SM208000in the Search box to open Generic Inquiry, then select + (Add New Record). -
In Inquiry Title, enter a name of your choice, for example
inventorysite. Leave the other boxes empty.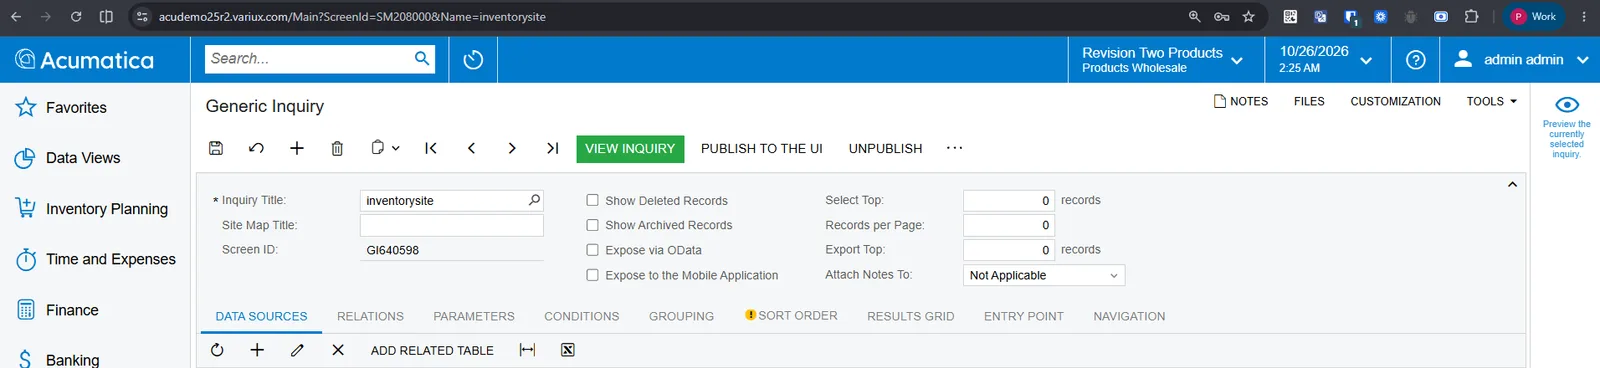
-
Open the Data Sources tab and add each data table you need as follows:
- Select + (Add Row).
- In the Source Name box, click the magnifying glass icon, type the name of the table you want to add in the Search box, then double-click the table you want.
- Description and Alias are filled in automatically; leave them as they are.
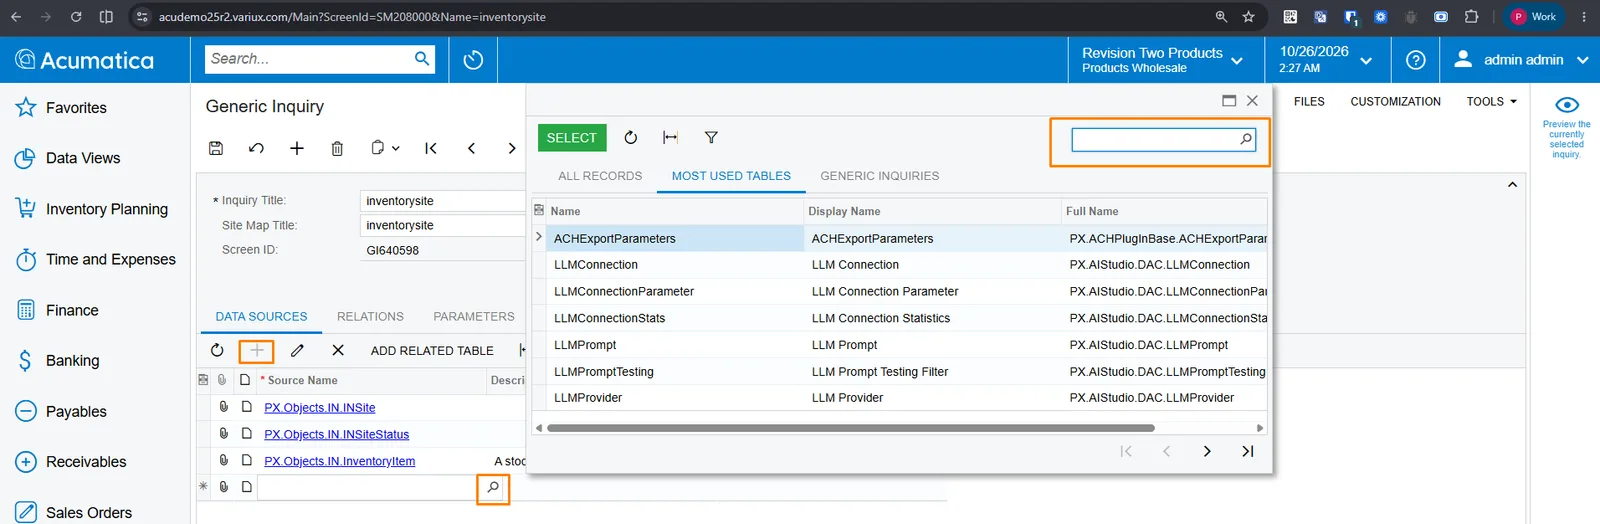
Example: add the 3 tables
INSiteStatus,InventoryItemandINSite.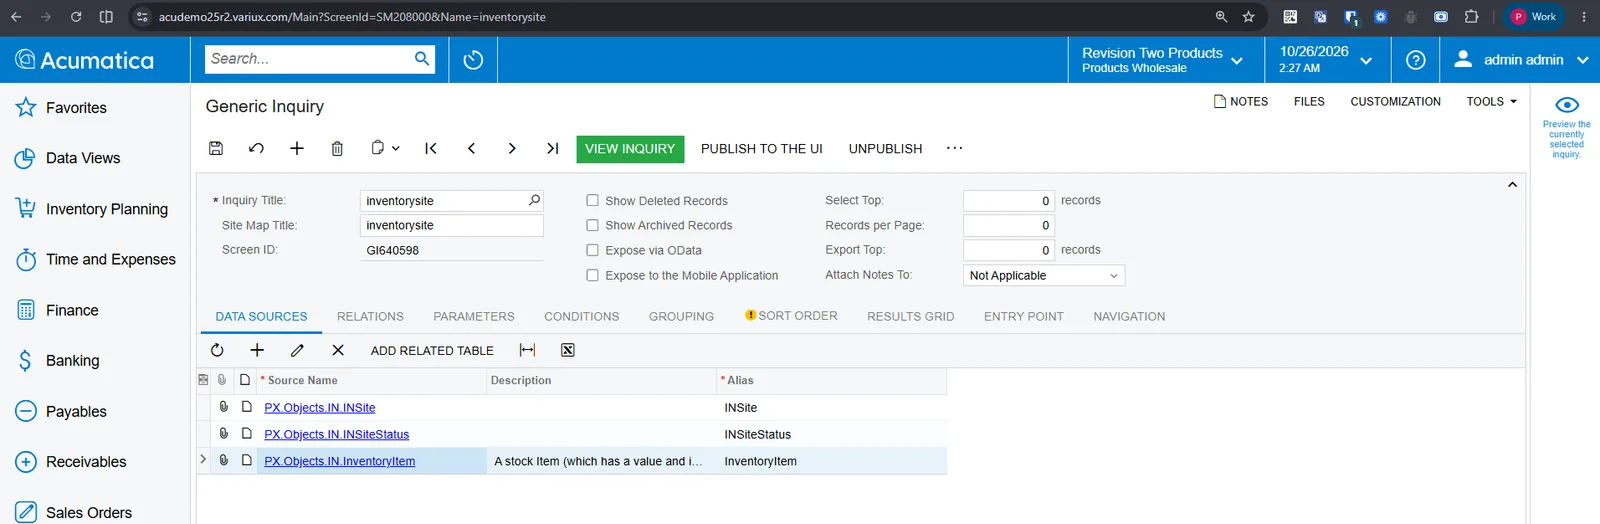
-
Open the Relations tab. For each relation:
- Select + in the Table Relations table, then select the Parent Table, Join Type and Child Table.
- For each row you add, click that row to select it. The Data Field Links For Active Relation table below shows only the link conditions of the selected row.
- Select + in the Data Field Links For Active Relation table below, then select the Parent Field, set Condition to Equals and select the Child Field.
Example:
- Select the INSiteStatus – Inner – InventoryItem row, then add the following in the Data Field Links table:
- Parent Field:
INSiteStatus.InventoryID - Condition:
Equals - Child Field:
InventoryItem.InventoryID
- Parent Field:
- Select the INSiteStatus – Inner – INSite row, then add the following in the Data Field Links table:
- Parent Field:
INSiteStatus.SiteID - Condition:
Equals - Child Field:
INSite.SiteID
- Parent Field:
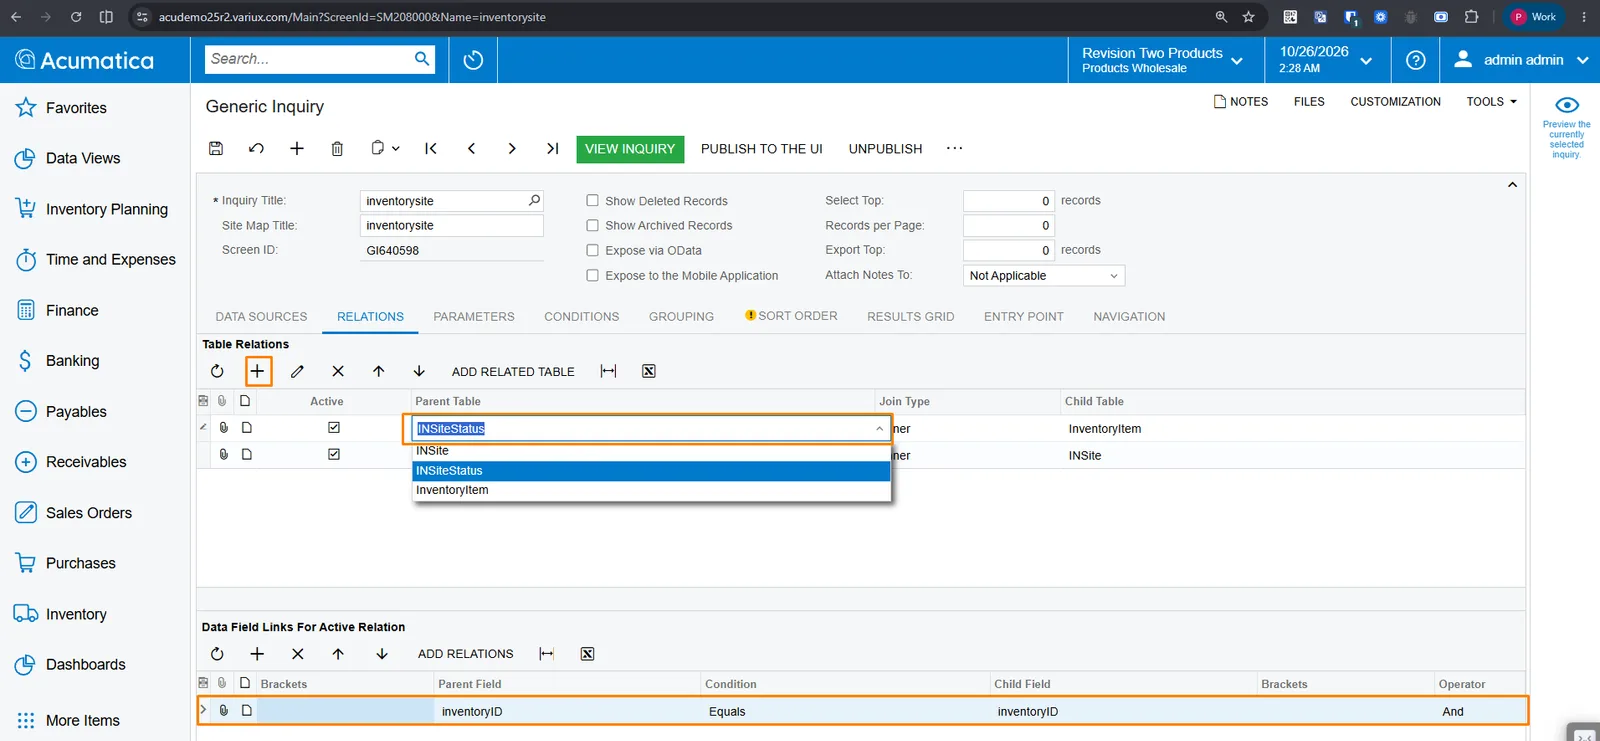
Note: Each relation needs its own link. If a link is missing, Acumatica joins every row of one table with every row of the other. In that case, each time one item changes, Acumatica sends the data of all items to HexaSync.
-
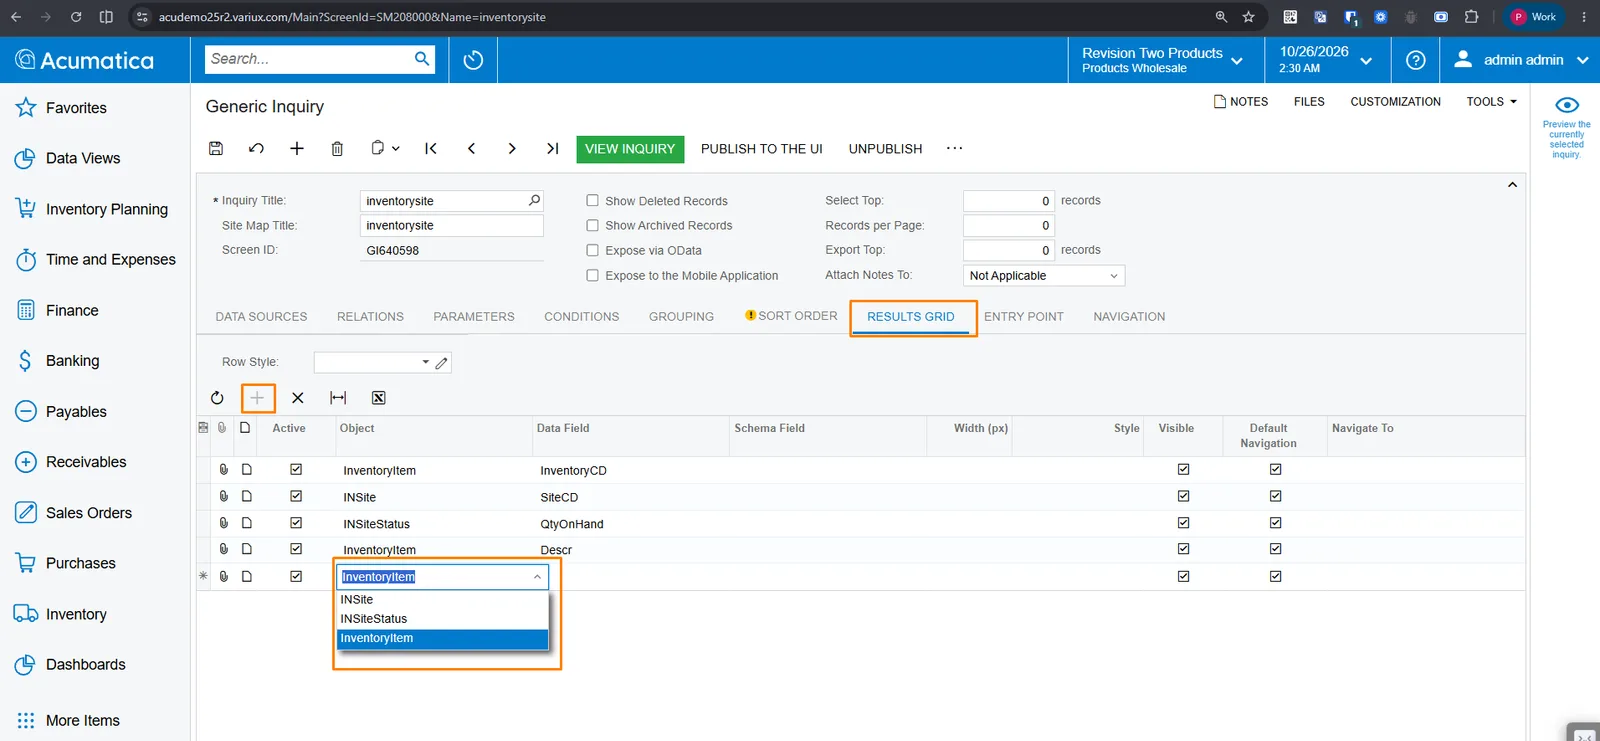
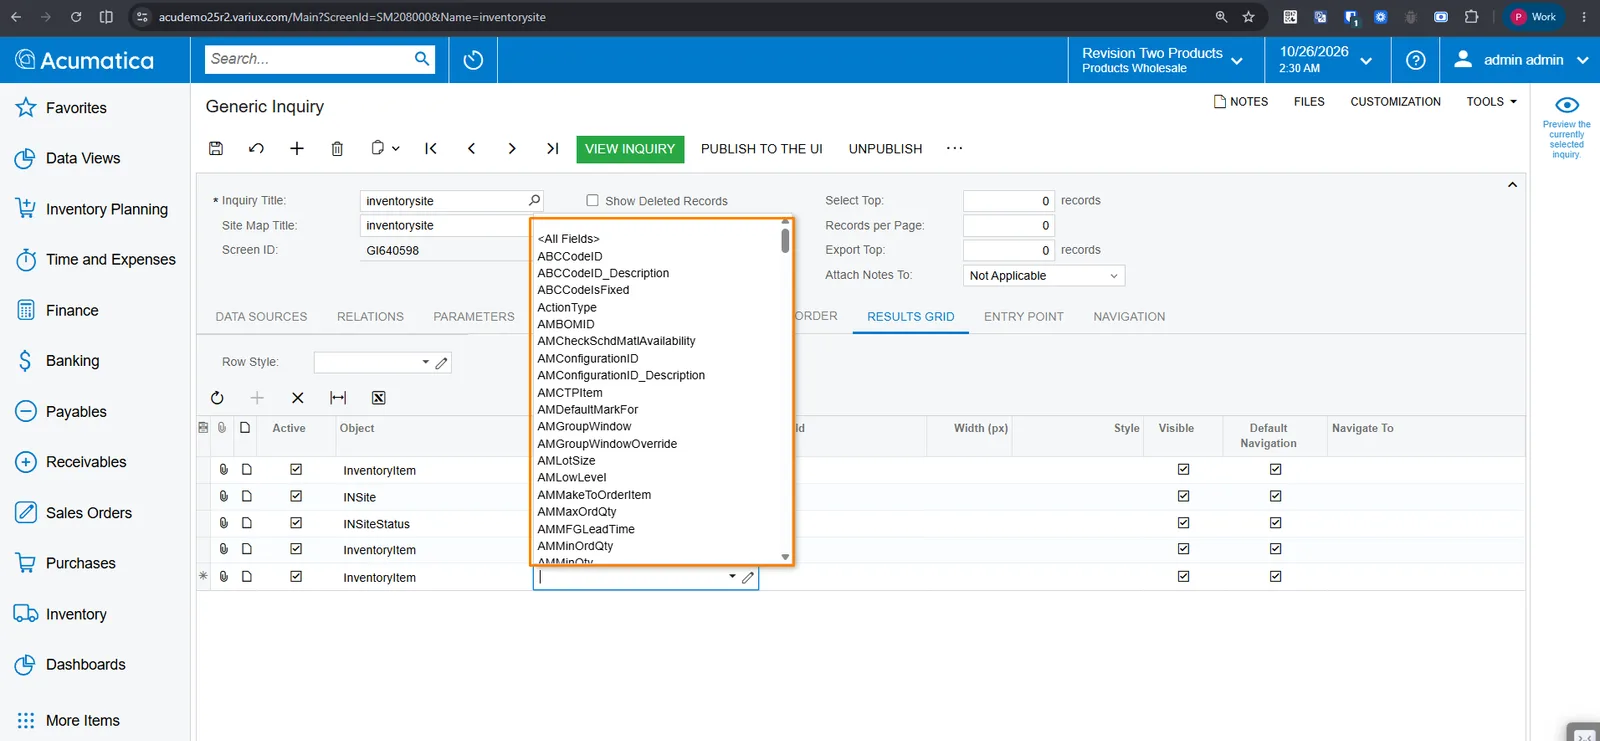
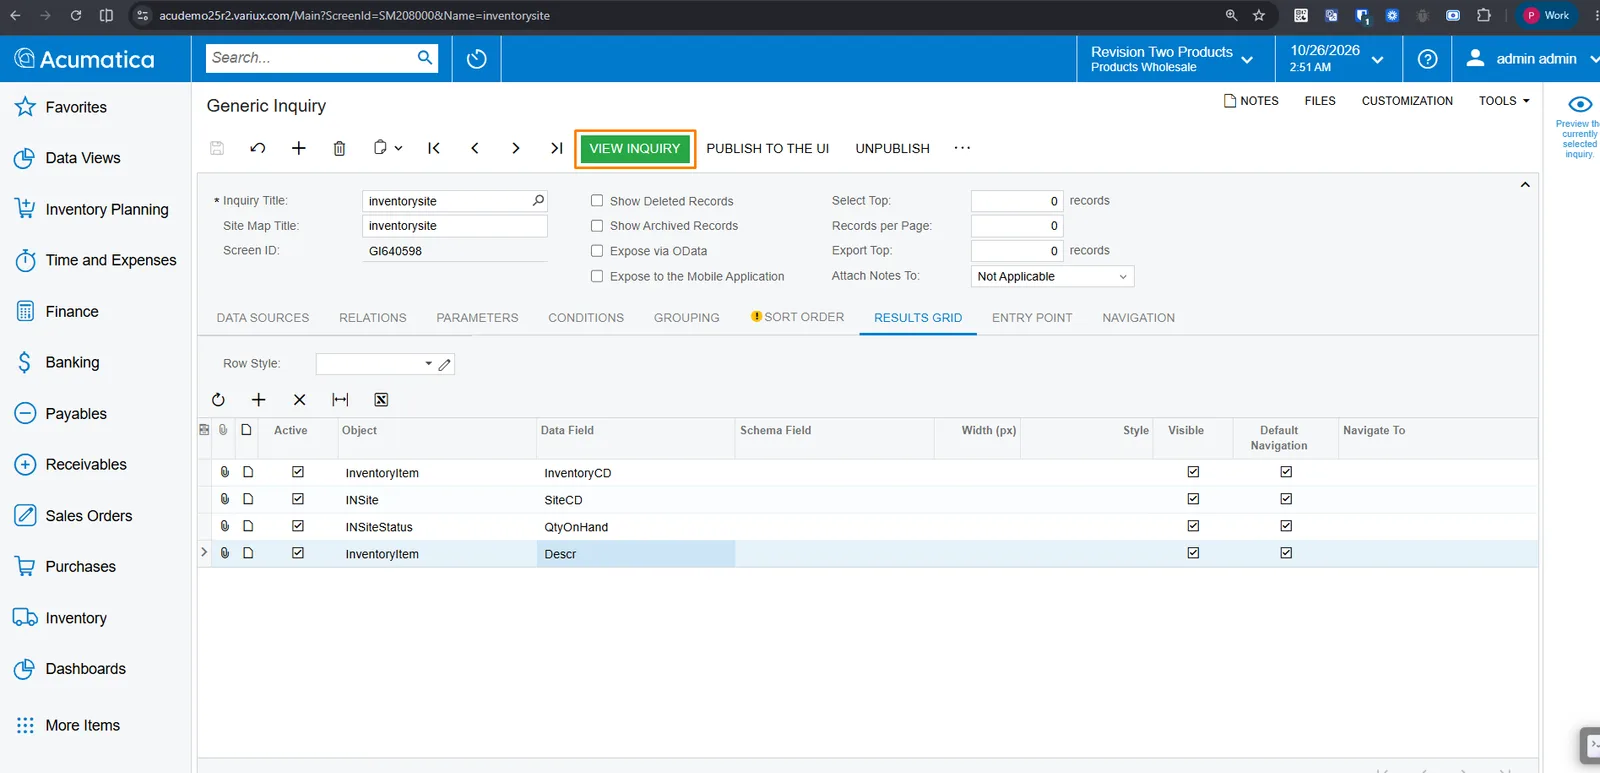
Open the Results Grid tab. For each row, select +, select the table in Object and the field in Data Field. Keep the default Caption.
Example:
- InventoryItem –
inventoryCD - INSite –
siteCD - INSiteStatus –
qtyOnHand - InventoryItem –
descr
Note:
- If you cannot select a Data Field, tick Visible right next to it to show the data fields you need to choose from.
- Do not change the Caption of
inventoryCD. HexaSync uses this column to identify the item and ignores the data if the column is renamed.
- InventoryItem –
-
Do not set up the Parameters or Grouping tabs, and do not use formulas in Results Grid. Acumatica does not guarantee that it sends the correct data when the GI has these settings. The Sort Order tab may show a warning sign; you do not need to do anything about it.
-
Select Save. You do not need to select Publish to the UI.
-
Select View Inquiry and check that:
- Every row has a warehouse.
- Each item appears only once in each warehouse.
- The quantity on hand differs between items.
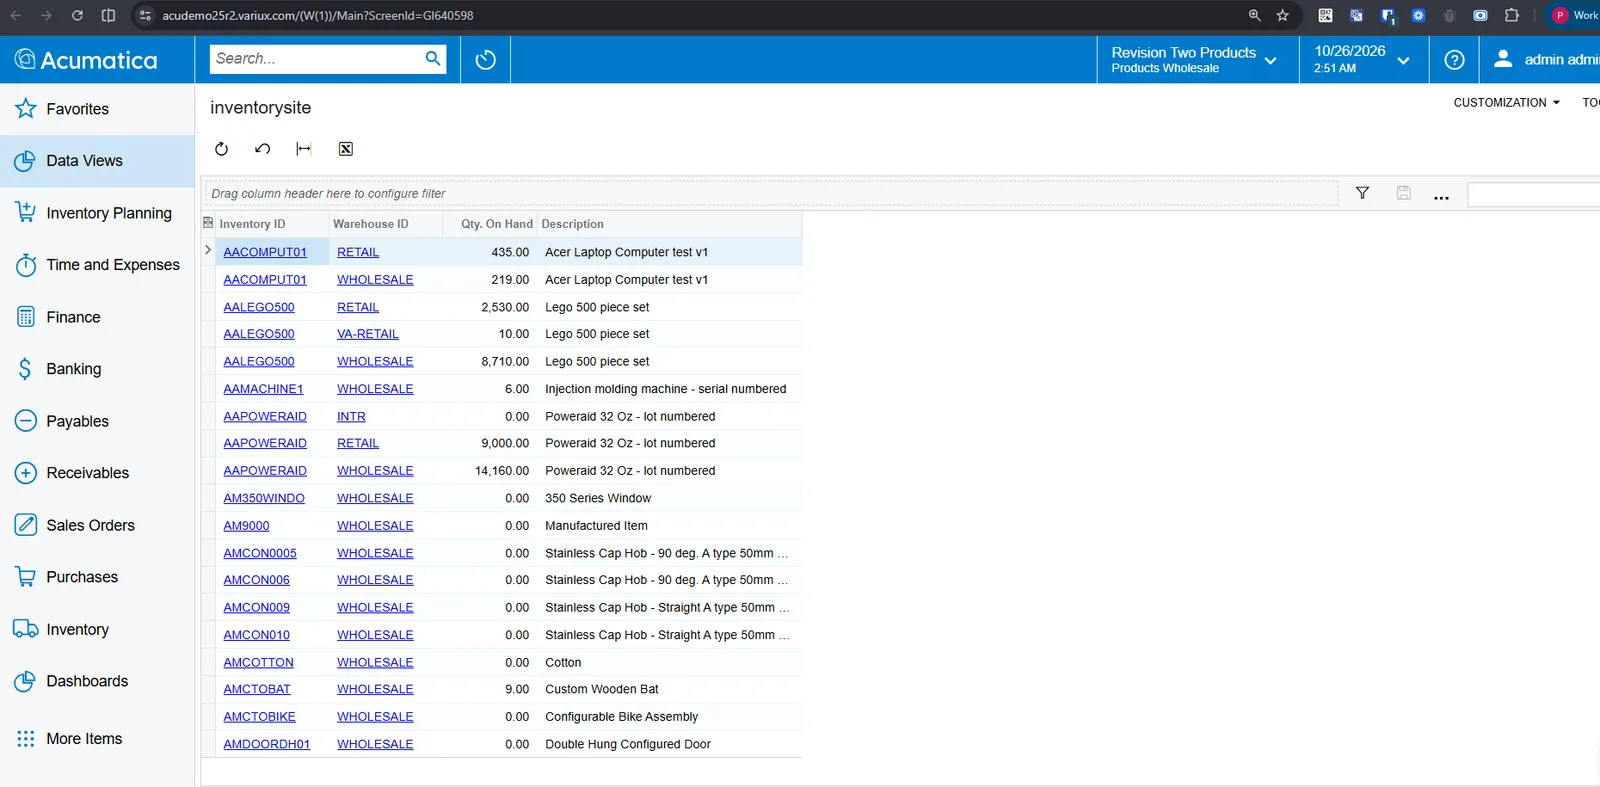
Note: If every item has the same quantity on hand, or many rows have no warehouse, a relation has no condition yet or the condition sits on a different relation row. Go back to the Relations tab and check each row.
Create a Push Notification
- Type
SM302000in the Search box to open Push Notifications, then select + (Add New Record). - Fill in the top part of the screen as follows:
| Field | Value |
|---|---|
| Destination Name | HexaSync |
| Destination Type | Webhook |
| Address | The Webhook URL you saved in Step 6 |
| Header Name | x-hexasync-webhook-secret |
| Header Value | The Webhook Secret you entered in Step 5 |
| Active | Selected |
Note: If you did not enter a Webhook Secret in Step 5, leave Header Name and Header Value empty.
- Open the Generic Inquiries tab. In the Inquiries table, select +, and in Inquiry Title select the GI you created above. Keep Active selected and clear Track All Fields.
- Select the row you just added. In the Fields table on the right, for each field to track, select +, then select the Table Name and Field Name. Acumatica sends data only when these fields change.
- InventoryItem –
inventoryCD - INSite –
siteCD - INSiteStatus –
qtyOnHand - InventoryItem –
descr
- InventoryItem –
- Select Save.
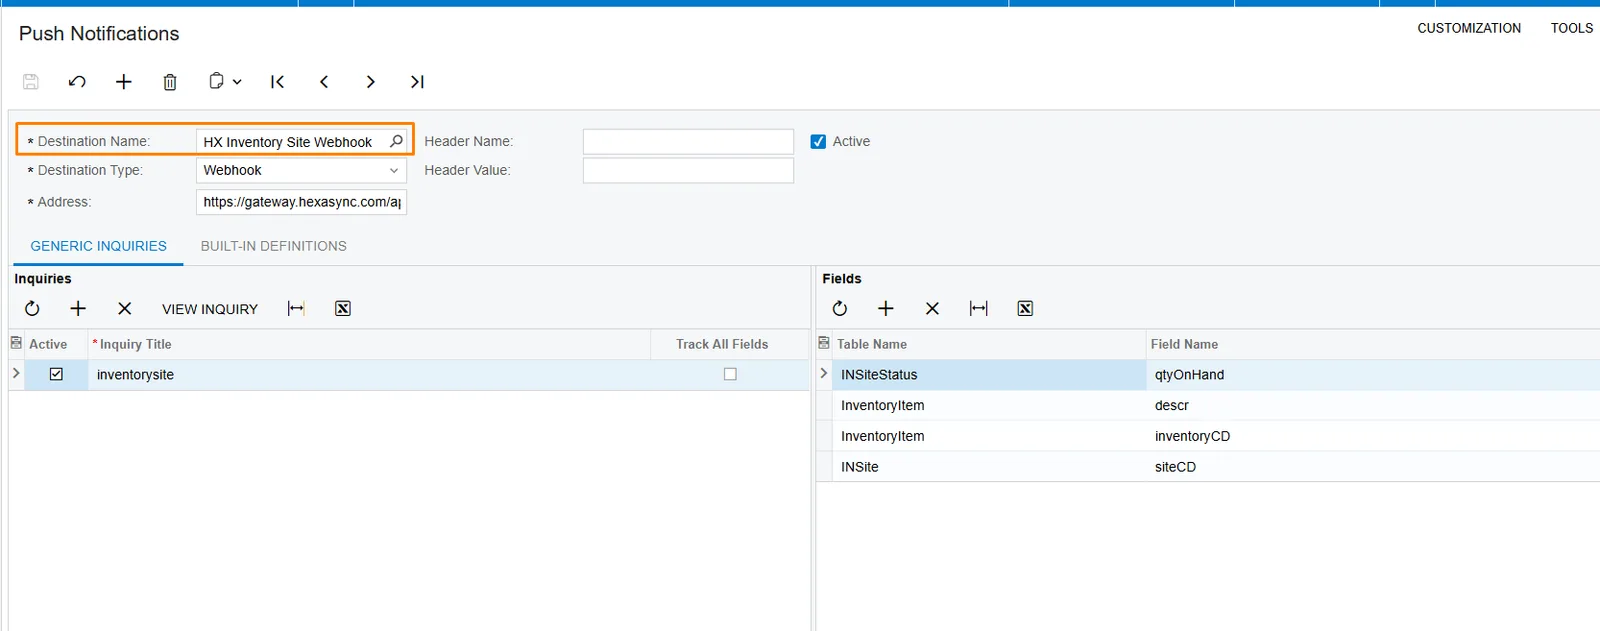
If you have several GIs, create each one as described in Create a Generic Inquiry, then add all of them to the same HexaSync Push Notification in actions 3–4.
Check the webhook
- In Acumatica, change a record that belongs to the GI in a tracked field and save it. For documents, Acumatica sends data only when the value really changes, usually after you select Release.
- On HexaSync, check that the new data appears within a few minutes.
Part 2: Re-authorize the Acumatica connection
Re-authorize when a task reports an authentication error, when you change the Acumatica user that HexaSync uses, or when the Beehexa team asks you to. Update the Connector App you are already using; do not create a new Connector App just to fix a sign-in error.
Step 1: Open Settings in the Acumatica Connector
- Open the matching Acumatica Connector in Connector Apps, then select Settings.
Step 2: Select Re-authorize
- In Settings, find the Acumatica connection details and select Re-authorize.
Cannot use Re-authorize? Only the owner of the connection details can re-authorize. Contact the person who created the Acumatica connection.
Step 3: Check the Connected Application in Acumatica
- On Connected Applications (SM303010), check that the HexaSync Connected Application is still Active, that Refresh Tokens is still Sliding Expiration, and that the shared secret has not expired.
Step 4: Reconnect
- Go back to the Re-authorize page on HexaSync and select Connect on the Acumatica card.
- Select Continue to Acumatica, sign in with a user who can view stock items and allow access as in Step 6 of Part 1.
Note:
- You created a new shared secret: open the setup link in Step 2 of Part 1 again, select Connect, select I will provide my Acumatica app and enter the details again as in Step 5 of Part 1. When the Acumatica card changes to Connected, stop there: do not select Create Acumatica Connector.
- You are switching to a different Connected Application (a different Client ID): contact Beehexa.
Part 3: Check before you use the data
- Check that you are on the right instance and the right company (tenant) in Acumatica.
- Run the [Acumatica] Stock Item Warehouse Details task and compare a few sample records with Acumatica.
- Check the number of stock items and warehouses. If some are missing, check the permissions of the user who signed in at Step 6 of Part 1.
Note: If you do not know which task to check, contact the Beehexa contact who supports your company.
Part 4: Common errors and how to fix them
We Couldn’t Finish Connecting Your Acumatica Instance
- Acumatica does not accept the Client ID or Client Secret: check that you copied the whole Client ID, including the part after the
@sign, and that the Connected Application is Active. If you are not sure about the shared secret value, select Add Shared Secret to create a new secret, then connect again. - Acumatica does not issue a refresh token: change Refresh Tokens › Mode to Sliding Expiration, select Save, then connect again.
- The authorization code expired or the Redirect URI does not match: check that the Redirect URIs tab has exactly
https://app.hexasync.com/callback/install/third-party, select Save, then connect again and sign in to Acumatica right away. - Select Back to installation to try again.
Webhook data updates slowly
- Only one thing changed in Acumatica, but Acumatica sends hundreds or thousands of rows to HexaSync, so HexaSync takes many hours to process them. The usual cause is a relation in the Generic Inquiry that has no condition.
- Open
SM208000, select the GI in use, check each row on the Relations tab as in Create a Generic Inquiry in Step 9, then select View Inquiry to check again. - You do not need to create the Push Notification again.
Other errors
| Message | How to fix it |
|---|---|
| HexaSync Could Not Build Your Acumatica Authorization Link | Select Choose another app, select I will provide my Acumatica app, check the Instance URL, then enter the details again. |
| The Acumatica page does not open after you select Continue to Acumatica | Check that the Instance URL is the address you use to open Acumatica, and that the Redirect URIs tab has been saved. |
| We Could Not Find Your Installation Details | Select Back to installation and connect again in the same browser. |
| Connected — Webhook URL Not Available | The connection is complete. If you need the Webhook URL, contact Beehexa and include the Technical details section shown on the screen. |
| The task has no data | The user who signed in at Step 6 does not have permission to view stock items. Re-authorize as described in Part 2 with a user who has permission. |
| The task reports that an endpoint was not found | The Acumatica instance does not have the Default endpoint version 20.200.001 on Web Service Endpoints (SM207060). Contact Beehexa. |
| The name already exists | Give the Connector App a different name. |
| Connector Quota Reached | Delete a Connector App you no longer use, or contact Beehexa to raise the quota. |
Part 5: Protect your information and stop the connection
- Enter the Client ID and Client Secret directly on the HexaSync authorization screen. Do not put the Client Secret in group chats, regular email or screenshots.
- Hide confidential data before you send a screenshot to the support team.
To stop the connection:
- Ask Beehexa to turn off the schedule and disconnect in HexaSync.
- The Acumatica administrator clears Active or deletes the shared secret of the HexaSync Connected Application on SM303010.
Note: Turning off the schedule is not the same as revoking access, and stopping the connection does not delete data that has already been synced.
Part 6: Information to send Beehexa when you need support
- Company name, Connector App name and connection type: Acumatica.
- Instance address, company (tenant), the step you are on, when the error happened and the error message.
- Recent changes to the Connected Application, shared secret, users or access permissions in Acumatica.
Screenshots must hide the Client Secret and confidential data. Contact the Beehexa contact who supports your company, or support@beehexa.com. See also the Beehexa Privacy Policy and the Beehexa Support Policy.
Part 7: Frequently asked questions
How does HexaSync connect to Acumatica?
HexaSync connects through a Connected Application that you create on your Acumatica instance (screen SM303010) and signs in with OAuth 2.0 (Authorization Code). You need the Instance URL, the Client ID and the Client Secret (the Value of the shared secret). HexaSync has the same permissions as the Acumatica user who authorized the connection in Step 6.
Why do I have to select Sliding Expiration for Refresh Tokens?
If you select No Refresh Tokens, Acumatica does not issue a refresh token and HexaSync cannot keep the connection alive. Set Mode to Sliding Expiration and select Infinite, as in Step 3.
What does a webhook do when you connect Acumatica to HexaSync?
A webhook lets Acumatica send data to HexaSync as soon as the data changes. You create a Generic Inquiry that contains the data to track and a Push Notification that sends that data to the Webhook URL that HexaSync shows when the connection is complete, as described in Step 9. If you have not set up a webhook yet, leave Webhook Secret empty in Step 5.
If the connection reports an authentication error, do I need to create a new Connector App?
No. Re-authorize the Connector App you are already using, as described in Part 2.
Does HexaSync write or change data in Acumatica?
No. The Acumatica Connector App only reads stock item data and inventory by warehouse, and changes nothing in Acumatica. When you use a webhook, Acumatica is the side that sends data to HexaSync.