How the connection flows
The SFTP server opens an outbound connection to Cloudflare and holds it. Nothing dials in. That single fact is what lets you close TCP/22 to the internet and still serve clients.
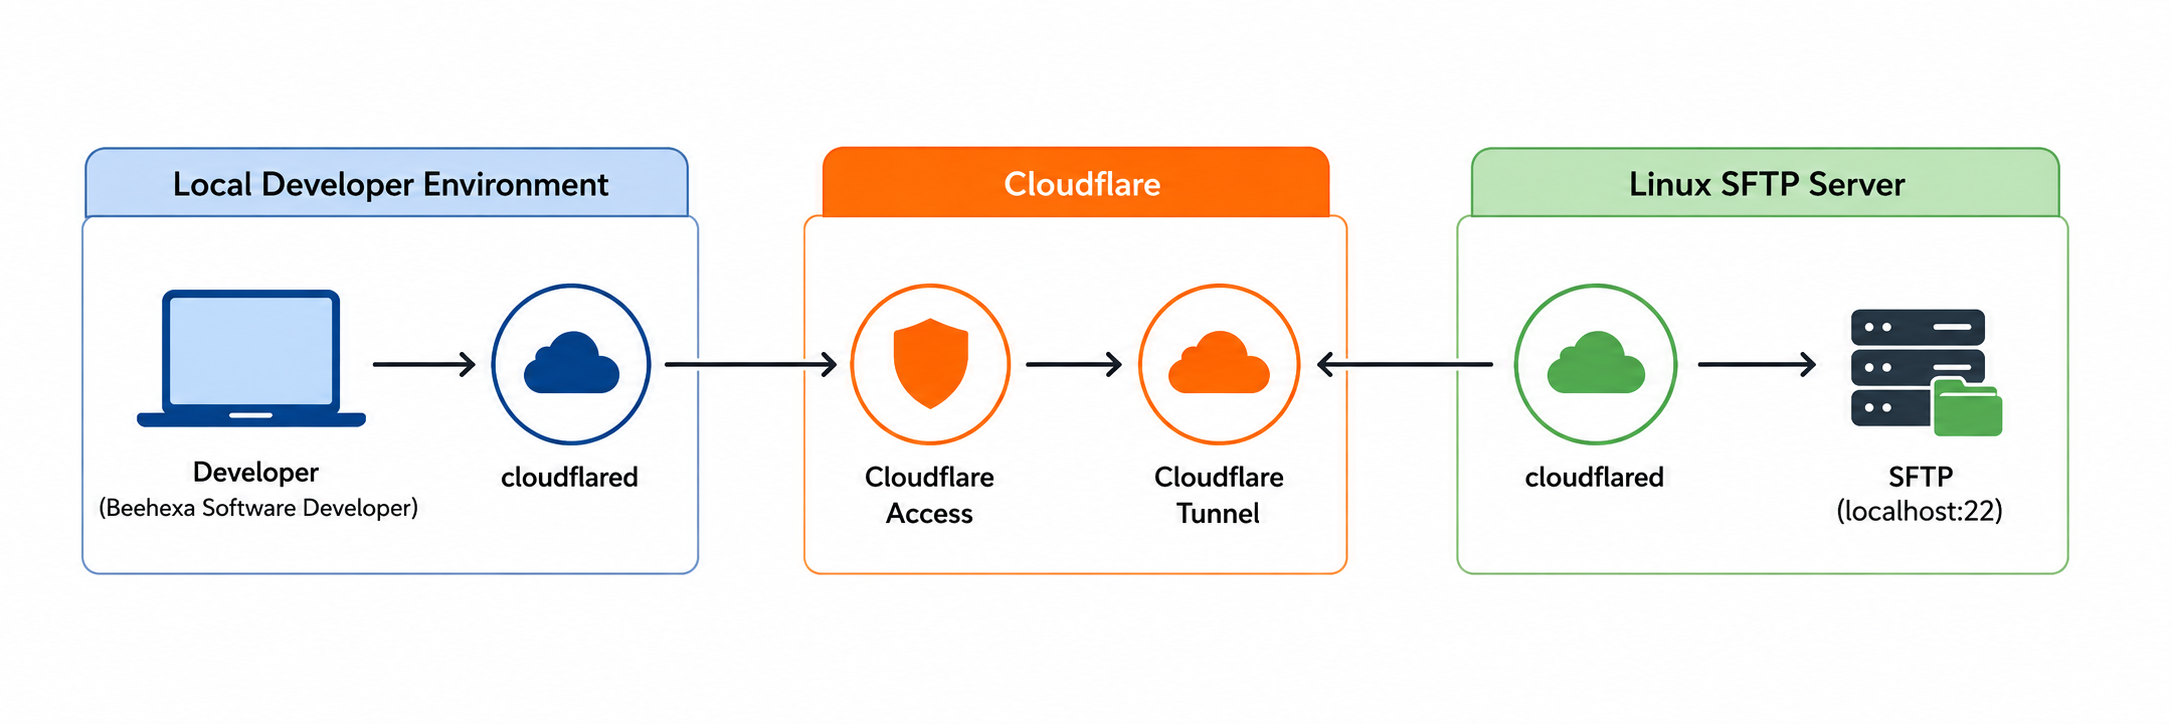
Both legs terminate at the Cloudflare edge, and the server’s leg is outbound. No firewall rule publishes port 22, and the server needs no public IP for this path. Existing IP-whitelist access stays the primary route; the tunnel is the backup.
Prerequisites
Before you begin
A Cloudflare account with the target domain on it — the hostname you publish must sit on a zone in that account.
Cloudflare Zero Trust enabled on the same account.
sudo on the Linux SFTP server, and outbound HTTPS (TCP/443) permitted from it to Cloudflare.
A dedicated SFTP user on that server.
Administrative access on the Local development environment that will connect, to install cloudflared there in Phase 6.
Placeholders used throughout
| Placeholder | Description |
| <HOSTNAME> | The public hostname clients will use, e.g. sftp.example.com |
| <TUNNEL_TOKEN> | The token Cloudflare generates in Phase 2. Treat it as a credential. |
| <YOUR_SFTP_SERVER> | The dedicated SFTP account on the Linux server |
| <CLIENT_ID> | Service token Client ID from Phase 5 |
| <CLIENT_SECRET> | Service token Client Secret from Phase 5 — shown once |
Phase 01
Do this on: Linux SFTP server (Terminal)
Prepare the SFTP server
Cloudflare Tunnel forwards to a service that already works. Everything here must pass locally before any tunnel exists, or a later failure is impossible to attribute.
Confirm SSH is running:
sudo systemctl status ssh
On distributions that name the unit differently:
sudo systemctl status sshd
Confirm it is listening on port 22:
sudo ss -lntp | grep :22
Connect locally:
ssh localhost
Configure authentication for the SFTP user.
Use a dedicated account — <YOUR_SFTP_SERVER> throughout this guide. Either method works:
- SSH key authentication
- Password authentication
For key authentication, add the client’s public key to the user’s authorized_keys:
/home/<YOUR_SFTP_SERVER>/.ssh/authorized_keys
Then set the permissions OpenSSH requires:
chmod 700 /home/<YOUR_SFTP_SERVER>/.ssh
chmod 600 /home/<YOUR_SFTP_SERVER>/.ssh/authorized_keys

chown -R <YOUR_SFTP_SERVER>:<YOUR_SFTP_SERVER> /home/<YOUR_SFTP_SERVER>/.sshGate — do not continue past this point
Authenticate as <YOUR_SFTP_SERVER> over localhost and complete a file transfer. If that fails now, it will fail through the tunnel too, and the tunnel will get the blame.
Phase 02
Do this on: Cloudflare dashboard
Create the tunnel
Login Cloudflare dashboard
Go to Networking → Tunnels → Create a tunnel → Cloudflared.
Name the tunnel.
Use a name that identifies the server it terminates on, not the service it carries — you will read it in a list months from now.
Set the tunnel environment:
- Operating system: Windows, or Linux / Debian
- Architecture: 64-bit
Copy the generated install command.
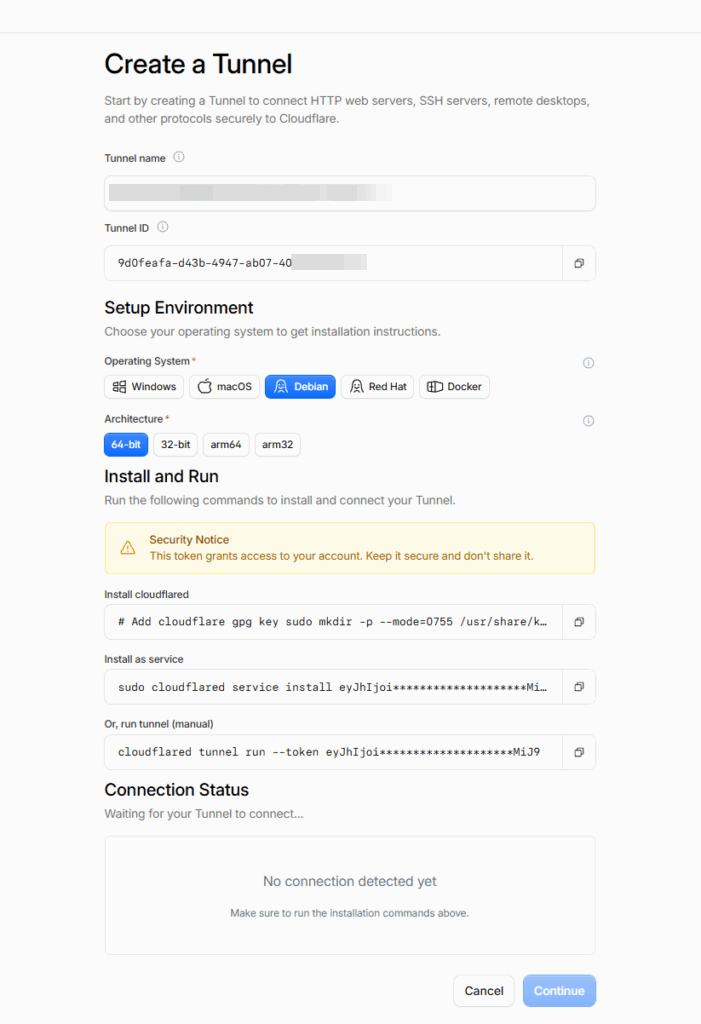
For Linux, Cloudflare produces a command in this form. You will run it in Phase 3 — do not run it yet.
sudo cloudflared service install <TUNNEL_TOKEN>The token is a credential
Anyone holding <TUNNEL_TOKEN> can register a connector for this tunnel. Do not paste it into a ticket, a chat message, or a shell history you share.
Phase 03
Do this on: Linux SFTP server (Terminal)
Install the connector
The connector is the process that holds the outbound leg open. Install and manage it on your own server, so control over access to the SFTP host stays with you.
Install cloudflared.
c# Add cloudflare gpg key
sudo mkdir -p --mode=0755 /usr/share/keyrings
curl -fsSL https://pkg.cloudflare.com/cloudflare-main.gpg | sudo tee /usr/share/keyrings/cloudflare-main.gpg >/dev/null

# Add this repo to your apt repositories
echo 'deb [signed-by=/usr/share/keyrings/cloudflare-main.gpg] https://pkg.cloudflare.com/cloudflared any main' | sudo tee /etc/apt/sources.list.d/cloudflared.list

# install cloudflared
sudo apt-get update && sudo apt-get install cloudflared
Match the architecture you selected in Phase 2.
Register the connector.
Run the command Cloudflare generated in Phase 2:
sudo cloudflared service install <TUNNEL_TOKEN>Verify the service:
sudo systemctl status cloudflaredExpected state:
active (running)
Verify the tunnel in the dashboard.
The tunnel’s status must read HEALTHY. A running service with an unhealthy tunnel means the connector started but could not register — read the logs below.
Read the logs when it does not.
Last 100 lines:
journalctl -u cloudflared --no-pager -n 100Follow in real time:
journalctl -u cloudflared -fService lifecycle reference
| To | Run |
| Start | sudo systemctl start cloudflared |
| Stop | sudo systemctl stop cloudflared |
| Restart | sudo systemctl restart cloudflared |
| Start on boot | sudo systemctl enable cloudflared |
No inbound rule is needed here
The connector dials out to Cloudflare. Do not open TCP/22 — or any other inbound port — to make this work. If you added an inbound rule while testing, remove it.
Phase 04
Do this on: Cloudflare dashboard
Publish the SSH route
The tunnel is connected but carries nothing yet. A route tells the connector which local service to hand traffic to.
Open the tunnel’s routes.
Networking → Tunnels → your tunnel → Routes → Add route → Published application.
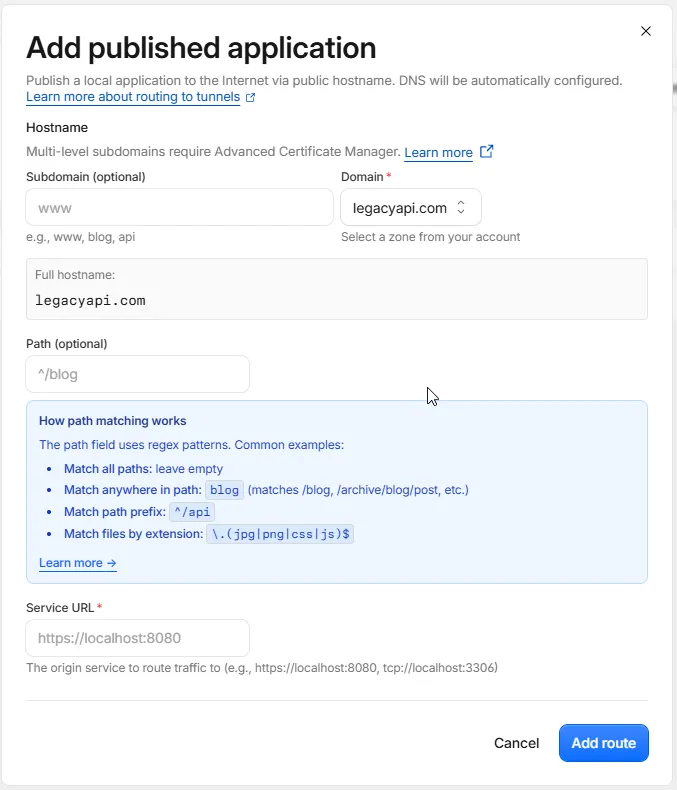
Point the hostname at local SSH.
| Setting | Value |
| Hostname | <HOSTNAME> |
| Service | SSH |
| URL | localhost:22 |
Which is the same as entering the service URL directly:
ssh://localhost:22localhost is the server’s own loopback
localhost:22 is resolved by the connector on the SFTP server. It is not your machine, and it is not a public address — which is why the SSH daemon never needs to listen on anything else.
Phase 05
Do this on: Cloudflare dashboard
Put Access in front of the route
Right now the hostname is reachable by anyone who knows it. Cloudflare Access adds the identity check that makes the route safe to leave published.
Create the Access application.
Zero Trust → Access controls → Applications → Add an application → Self-hosted.
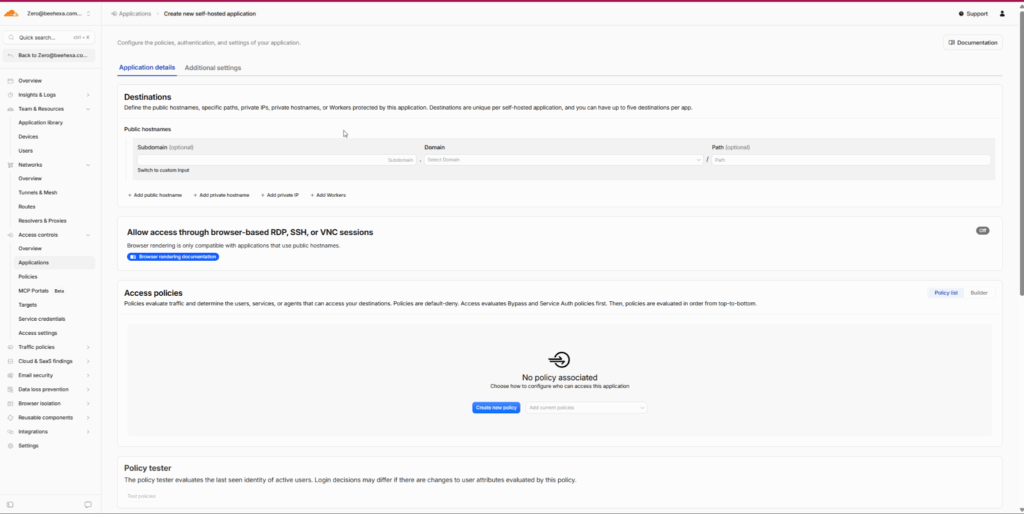
| Setting | Value |
| Application name | Beehexa SFTP Access |
| Domain | <HOSTNAME> |
The domain must be the hostname you published in Phase 4, or the policies below will guard nothing.
You need two policies, and they do different jobs
People and machines prove who they are in incompatible ways: one can read an emailed PIN, the other cannot open a browser. Both policies sit on the same application.
| Policy A — people | Policy B — machines | |
| Who it is for | Named Beehexa staff | Automated server-to-server jobs |
| Action | Allow | Service Auth |
| Include | Emails: team@beehexa.com | Service Token: Beehexa SFTP Service |
| Caller presents | A one-time PIN sent to their inbox | Client ID and Client Secret headers |
| Browser needed | Yes, once per session | No |
Policy A — allow access by email
Create the policy.
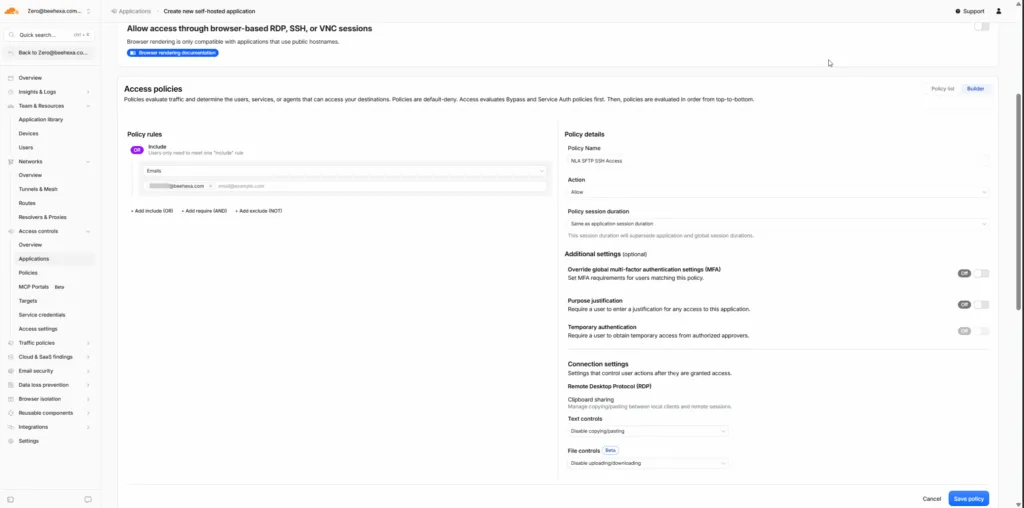
| Setting | Value |
| Policy name | Allow Beehexa SFTP Access |
| Action | Allow |
| Include → Emails | team@beehexa.com |
List addresses, not domains
Include specific accounts rather than an entire email domain. A domain rule silently admits every account created on that domain afterwards.
Enable One-Time PIN for the application.

In the Access application: Authentication → Choose available identity providers for this application → select onetimepin.
Two different questions
One-Time PIN decides how a user authenticates. The Access policy decides who is allowed to connect. Enabling the first without the second admits nobody; the second without the first gives your allowed users no way to prove they are themselves.
Policy B — allow access by service token
Create the service token.
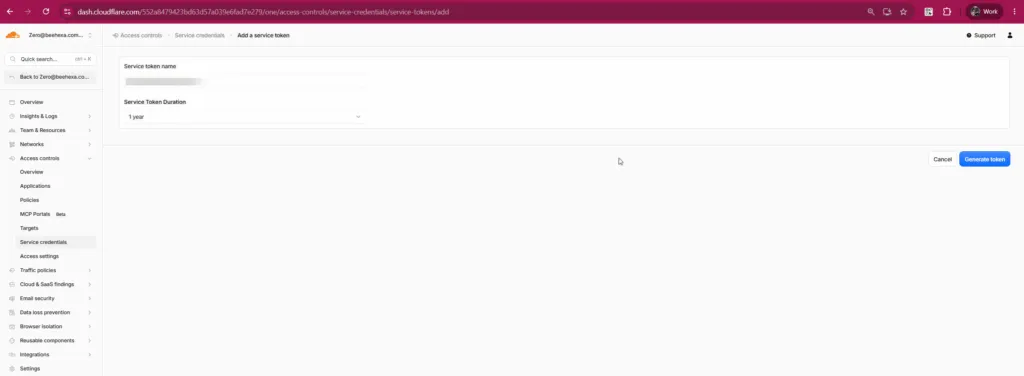
Zero Trust → Access controls → Service credentials → Service Tokens → Create Service Token.
| Setting | Value |
| Token name | Beehexa SFTP Service |
| Duration | 1 year |
Cloudflare then displays a Client ID and a Client Secret.
The secret is shown once
Store both values in your secret manager before leaving the screen. The Client Secret cannot be retrieved again — recovering from a loss means issuing a new token and updating every job that uses it.
A one-year duration expires
Not in the source pages
Put the expiry date in a calendar with a month of warning. An expired service token fails as a refused connection in an automated job, usually at the least convenient moment.
Create the policy.
| Setting | Value |
| Policy name | Allow Beehexa SFTP Service |
| Action | Service Auth |
| Include → Service Token | Beehexa SFTP Service |
This lets automated services reach the SFTP server without a one-time PIN and without a browser.
Phase 06
Do this on: Local development environment (Terminal)
Connect from the command line
Entire phase is new — verify before publishing
Neither source page covered the client side, yet page two’s checklist required it. The client reaches the hostname through cloudflared, which handles the Access challenge and then hands a plain SSH stream to your SFTP client.
Two ways to connect — pick before you read on
This phase uses a proxy command: no listening port, one authenticated stream per connection, and it works only with tools that accept a ProxyCommand — the ssh and sftp binaries, and little else. Phase 7 binds a real local port instead, which is what FileZilla, WinSCP, and any application library will need.
Install cloudflared on the client.
The same binary as the server — use the install instructions in Phase 3, picking the tab for the client’s operating system. Nothing else is needed here: on the client cloudflared runs on demand as a proxy command, so do not run service install and do not give it a tunnel token.
Connect as a person.
ssh -o ProxyCommand="cloudflared access ssh --hostname %h" \
<YOUR_SFTP_SERVER>@<HOSTNAME>A browser window opens for the one-time PIN. After that the SSH session proceeds normally, and your existing key or password authenticates you to the server itself.
Make it permanent in ~/.ssh/config.
Host <HOSTNAME>
  User <YOUR_SFTP_SERVER>

ProxyCommand cloudflared access ssh --hostname %hAny SSH-aware tool then works against the hostname directly:
sftp <YOUR_SFTP_SERVER>@<HOSTNAME>Connect as an automated job.
Pass the service token from Phase 5 to cloudflared. No browser is involved.
sftp -o ProxyCommand="cloudflared access ssh --hostname %h \
  --service-token-id <CLIENT_ID> \
  --service-token-secret <CLIENT_SECRET>" \

<YOUR_SFTP_SERVER>@<HOSTNAME>Access authenticates the connection; the SFTP server still authenticates the user. The job needs the service token and the SSH key. To keep the secret out of the process list, set TUNNEL_SERVICE_TOKEN_ID and TUNNEL_SERVICE_TOKEN_SECRET in the job’s environment and drop both flags.
Editor — confirm before this page goes live
These four steps follow Cloudflare’s standard client pattern but were not present in either source page, so nothing here has been checked against the Beehexa environment. Run all four against the real hostname and paste the working output back into this section.
Phase 07
Do this on: Local development environment
Bind a local port for other applications
Entire phase is new — verify before publishing
A proxy command only helps tools that accept one. FileZilla, WinSCP, a scheduled ETL job, an SFTP library inside a HexaSync connector — none of them will shell out to cloudflared. They need a socket.
cloudflared access ssh opens one: it listens on a port on the Local development environment, authenticates to Cloudflare Access on its own, and forwards everything to the published hostname. To the application it looks like an ordinary SFTP server on 127.0.0.1.
tcp, ssh, rdp and smb are the same command
Cloudflare’s protocol reference says to use access ssh for an SSH route and access tcp for a TCP route, which reads as though they behave differently. In the CLI they do not: tcp is declared with ssh, rdp and smb as aliases of one subcommand, sharing every flag. Either spelling reaches the Phase 4 route — this guide uses ssh so the command matches the route type. Verified in cmd/cloudflared/access/cmd.go, cloudflared 2026.8.2.
How the two credentials map
| Browser sign-in | Access token | |
| What it is | The identity provider flow on the Access application — today One-Time PIN, and the same client command if you later add Google, Azure or Okta | The Phase 5 service token: a Client ID and Client Secret pair, the non-interactive equivalent of client credentials |
| Policy it matches | Policy A, action Allow | Policy B, action Service Auth |
| Suits | A person at a desk with FileZilla open | An unattended job or a service on an integration host |
| Re-authentication | When the session expires | Never, until the token expires |
Bind the port with a browser sign-in.
cloudflared access ssh --hostname <HOSTNAME> --url 127.0.0.1:2222
A browser opens for the Access challenge on the first run. After that the command stays in the foreground holding the listener open — closing the terminal closes the port. Any free port works; 2222 keeps it clear of a local SSH daemon on 22.
Point the application at the local port.
Leave the command running and configure the client as though the SFTP server were on this machine:
| Setting | Value |
| Protocol | SFTP / SSH File Transfer Protocol |
| Host | 127.0.0.1 |
| Port | 2222 |
| User | <YOUR_SFTP_SERVER> |
| Authentication | The key or password from Phase 1 |
That configuration works unchanged in FileZilla, WinSCP, and any SFTP library. From the shell it is simply:
sftp -P 2222 <YOUR_SFTP_SERVER>@127.0.0.1
The host key will look wrong the first time
The server presents its own SSH host key, but the client records it against [127.0.0.1]:2222. Expect an unknown-host prompt on first connection, and expect a mismatch warning if that port was ever used for a different host. Verify the fingerprint against the SFTP server rather than accepting it blindly.
Bind the port without a browser.
For an unattended host, authenticate with the Phase 5 service token instead. Nothing opens, and no one has to be present.
cloudflared access ssh --hostname <HOSTNAME> --url 127.0.0.1:2222 \
  --service-token-id <CLIENT_ID> \
  --service-token-secret <CLIENT_SECRET>
A secret on the command line is readable
Anyone who can run ps on that machine sees both values, and your shell writes them to its history. Every flag below has an environment variable equivalent — use those instead, from a 0600 file, as the service in the next step does.
| Flag | Short form | Environment variable |
| –hostname | -T, –tunnel-host | TUNNEL_SERVICE_HOSTNAME |
| –url | -L, –listener | TUNNEL_SERVICE_URL |
| –service-token-id | –id | TUNNEL_SERVICE_TOKEN_ID |
| –service-token-secret | –secret | TUNNEL_SERVICE_TOKEN_SECRET |
| –header | -H | — |
Keep the listener up.
On an integration host the port has to survive reboots. Run the bind as a systemd service — this is the Local development environment, and it is unrelated to the connector service from Phase 3.
/etc/cloudflared-sftp.env — the secret, kept out of the process list:
TUNNEL_SERVICE_TOKEN_ID=<CLIENT_ID>
TUNNEL_SERVICE_TOKEN_SECRET=<CLIENT_SECRET>/etc/systemd/system/cloudflared-sftp.service:
[Unit]
Description=Cloudflare Access bind for SFTP
After=network-online.target

[Service]
EnvironmentFile=/etc/cloudflared-sftp.env
ExecStart=/usr/bin/cloudflared access ssh \
  --hostname <HOSTNAME> --url 127.0.0.1:2222
Restart=always
RestartSec=5

[Install]
WantedBy=multi-user.targetsudo chmod 600 /etc/cloudflared-sftp.env
sudo systemctl daemon-reload
sudo systemctl enable --now cloudflared-sftp
sudo systemctl status cloudflared-sftpThe bound port has no access control of its own
Once bound, that port is an authenticated path to the SFTP server for any process on the machine — access has already been satisfied, and the local listener does not ask again. Bind it to 127.0.0.1, never 0.0.0.0: the second turns the client into an unauthenticated gateway on your LAN and undoes the reason for closing port 22 in the first place.
Editor — confirm before this page goes live
Every command, flag and environment variable here is verified against cloudflared 2026.8.2 and Cloudflare’s current documentation, but none of it has been run against the Beehexa hostname. Bind the port, connect a GUI client through it, start the service once, and paste the working output into this section before publishing.
Final validation
Work top to bottom. The last item is a separate decision, not another checkbox — it removes your fallback.
01 — SSH answers on localhost:22 on the SFTP server
01 — The dedicated SFTP user exists
01 — That user’s authentication works locally, by key or password
03 — cloudflared is installed and active (running)
03 — cloudflared is enabled to start on boot
03 — The tunnel reads HEALTHY in the Cloudflare dashboard
04 — The route resolves the hostname to ssh://localhost:22
05 — A staff member connects with a one-time PIN
05 — An automated job connects with the service token, no browser
05 — Someone outside the policy is refused
07 — A local bind on 127.0.0.1:2222 accepts a GUI SFTP client
07 — The unattended bind starts with a service token, no browser
07 — No bind listens on 0.0.0.0
— No inbound rule publishes TCP/22 to the internet
— Only once every item above passes: retire the old VPN or IP-whitelist access
Troubleshooting
New section — assembled from the failure points above
| Symptom | Where to look first |
| Service is active (running), tunnel is not HEALTHY | The connector started but could not register. Read journalctl -u cloudflared -n 100 — usually a bad or already-used token, or outbound 443 blocked by an egress firewall. |
| Tunnel is HEALTHY, the hostname refuses to connect | The route (Phase 4). Confirm the published application’s hostname matches exactly and the service URL is ssh://localhost:22. |
| Browser opens, then access is denied | The Access policy (Phase 5), not the tunnel. Your address is not in the Include list, or the Access application’s domain is not the published hostname. |
| No browser opens and the connection is refused | One-Time PIN is not enabled as an identity provider for this application. |
| Automated job is refused, staff connections work | The service token. Check the two environment variables are set in the job’s own environment, that the token has not expired, and that Policy B’s action is Service Auth rather than Allow. |
| A browser opens even though service token flags were passed | A cached Access token from an earlier interactive sign-in can take precedence. Clear the cached tokens in ~/.cloudflared/ and retry, and confirm Policy B’s action is Service Auth — with Allow, Access prompts for an identity provider login regardless of the token. |
| The local bind fails to start | Something already holds the port. Pick another, or find the holder with sudo ss -lntp | grep :2222. |
| Host key verification failed on 127.0.0.1 | Expected if that local port previously reached a different host. Remove the stale entry for [127.0.0.1]:2222 from known_hosts, then verify the new fingerprint against the SFTP server before accepting it. |
| Access passes, then SSH rejects the login | Server-side authentication (Phase 1), which Access does not touch. Re-test over ssh localhost and check the .ssh permissions. |
Currency
What this was checked against
Everything added beyond the two source pages was verified on 25 August 2026 against the references below. Cloudflare has reorganised its documentation paths, so the links here are the current ones, not the ones the old pages pointed at.
| Claim | Checked against |
| apt key, repository line and install command | pkg.cloudflare.com — verbatim |
| yum / dnf repository file | pkg.cloudflare.com — verbatim |
| Release asset filenames, including cloudflared-linux-x86_64.rpm | cloudflared 2026.8.2 release manifest |
| Windows has no repository and does not self-update | Downloads |
| ProxyCommand cloudflared access ssh –hostname %h | SSH with client-side cloudflared |
| Local port bind with –url host:port | Arbitrary TCP |
| tcp, ssh, rdp and smb are aliases of one subcommand; flag short forms and environment variables | cloudflared source, cmd/cloudflared/access/cmd.go at 2026.8.2 — the documentation does not state this |
| Service token headers, and that the policy action must be Service Auth | Service tokens |
| Route protocol types and service URL formats | Protocols for published applications |
Two things to re-check at the next review
Dashboard navigation labels move faster than anything else in this guide — Cloudflare has already renamed these sections once, and the paths in Phases 2, 4 and 5 are inherited from the source pages rather than re-verified in the console. And cloudflared ships roughly monthly, so confirm the release tag above is still recent before treating the CLI details as current.