
Shopify Order API 2026 – Create An Order Using Postman
Table of Contents
This tutorial shows how to create an order in a Shopify store from Postman with the Shopify Admin API: get an access token, build the POST orders.json request, send an order with tax lines split across taxable line items, and read the response. It was updated in November 2026 for the current way of getting a token and the current API version.
What changed since 2022. The first version of this guide used a Shopify “private app” and put the API key and password in the request URL. That is no longer how you get a token: since January 1, 2026 new custom apps are no longer created in the Shopify admin: Shopify’s Help Center says custom apps are created and managed in the Dev Dashboard. Requests now send the token in the
X-Shopify-Access-Tokenheader.
Before you start
- A Shopify store you own (or a development store) and the Postman app.
- The Admin API version you will call. Shopify releases a new version every quarter and supports each one for at least 12 months; the latest stable version in November 2026 is 2026-10, supported until October 16, 2027 (API versioning). Replace
{api_version}below with the version you use. - The REST Admin API is a legacy API since October 1, 2024 (REST Admin API reference). It still works, and it is the simplest way to test an order from Postman, but new public apps must use the GraphQL Admin API (see the GraphQL alternative at the end).
Step 1: Get an Admin API access token
Create an app for your store in the Dev Dashboard and give it permission to write orders (Create apps using the Dev Dashboard):
- In the Dev Dashboard, open Apps, select Create app, choose Start from Dev Dashboard, name the app and select Create.
- On the app’s Versions page, select the access scopes the app needs. To create orders, add
write_orders(the scope Shopify lists for creating orders in the orderCreate reference). Then select Release. - Install the app on your store: select Install app from the app’s Installs card, choose the store and select Install.
- Open the app’s Settings and copy the Client ID and Client secret from the Credentials card.
Exchange the client ID and secret for an access token with the client credentials grant (Client credentials grant). In Postman, create this request:
POST https://{shop}.myshopify.com/admin/oauth/access_token
Content-Type: application/x-www-form-urlencoded

grant_type=client_credentials&client_id={client_id}&client_secret={client_secret}
{shop} is your store’s subdomain, without .myshopify.com. The response contains the token:
{
  "access_token": "{access_token}",
  "scope": "write_orders",
  "expires_in": 86399
}- The token expires after 24 hours (
expires_inis always 86399 seconds). Request a new one when it expires. - The client credentials grant only works when the app and the store belong to the same Shopify organization. An app for someone else’s store needs the authorization code grant or token exchange instead.
- Treat the client secret and the token like passwords: keep them in a Postman environment variable, never in a shared collection, a screenshot or a URL.
Already have a legacy custom app? Custom apps created in the Shopify admin before January 1, 2026 keep working. Their Admin API access token was shown once when the app was installed, under Apps > Develop apps > your app > API credentials. If you no longer have it, uninstall and reinstall the app to generate a new one (Generate access tokens for admin-created custom apps). Make sure the app has the write_orders scope.
Step 2: Set up the request in Postman
Create a new request in Postman:
- Method:
POST - URL:
https://{shop}.myshopify.com/admin/api/{api_version}/orders.jsonFor example, with API version 2026-10: https://{shop}.myshopify.com/admin/api/2026-10/orders.json.
- Headers tab: add these two headers.
X-Shopify-Access-Token: {access_token}
Content-Type: application/json
Every REST Admin API request authenticates with the X-Shopify-Access-Token header. Don’t put the token, API key or password in the URL.
Step 3: Add the order JSON to the body
Open the Body tab, select raw and JSON. The smallest valid order has one line item. You can reference a product variant from your store:
{
  "order": {
    "line_items": [
      {
        "variant_id": 123456789,
        "quantity": 1
      }
    ]
  }
}
Replace 123456789 with the numeric ID of a variant in your store.
To create an order with tax lines split across taxable line items, send custom line items (title and price, no product) and the tax lines that apply to them. Here, the shoes are not taxable, so the state tax (6%) and county tax (2.5%) are applied to the coat and the two berets only:
{
  "order": {
    "line_items": [
      {
        "title": "Red Leather Coat",
        "price": 129.99,
        "grams": "1700",
        "quantity": 1
      },
      {
        "title": "Blue Suede Shoes",
        "price": 85.95,
        "grams": "750",
        "quantity": 1,
        "taxable": false
      },
      {
        "title": "Raspberry Beret",
        "price": 19.99,
        "grams": "320",
        "quantity": 2
      }
    ],
    "tax_lines": [
      {
        "price": 10.2,
        "rate": 0.06,
        "title": "State tax"
      },
      {
        "price": 4.25,
        "rate": 0.025,
        "title": "County tax"
      }
    ],
    "total_tax": 14.45
  }
}
The line_items say what is ordered (title, price, weight in grams and quantity), and the tax_lines say which taxes the taxable items are subject to and how much each one is. More examples (customer, addresses, transactions, inventory behaviour) are in the Order resource reference.
Step 4: Send the request and read the response
Click Send. A successful request returns 201 Created and the new order. The response is long; these are the fields to check (values shortened):
{
  "order": {
    "id": 4244165656639,
    "admin_graphql_api_id": "gid://shopify/Order/4244165656639",
    "name": "#1157",
    "financial_status": "paid",
    "currency": "AUD",
    "subtotal_price": "255.92",
    "total_tax": "14.45",
    "total_price": "270.37",
    "tax_lines": [
      { "price": "10.20", "rate": 0.06, "title": "State tax" },
      { "price": "4.25", "rate": 0.025, "title": "County tax" }
    ],
    "line_items": [
      {
        "title": "Red Leather Coat",
        "price": "129.99",
        "quantity": 1,
        "taxable": true,
        "tax_lines": [
          { "price": "7.81", "rate": 0.06, "title": "State tax" },
          { "price": "3.26", "rate": 0.025, "title": "County tax" }
        ]
      }
    ]
  }
}idis the order ID for later REST calls;admin_graphql_api_idis the same order in the GraphQL Admin API.subtotal_price(255.92) +total_tax(14.45) =total_price(270.37).- Shopify splits each order-level tax line across the taxable line items: the coat carries 7.81 of the 10.20 state tax and 3.26 of the 4.25 county tax. The non-taxable shoes get no tax lines.
Step 5: Verify the order in the Shopify admin
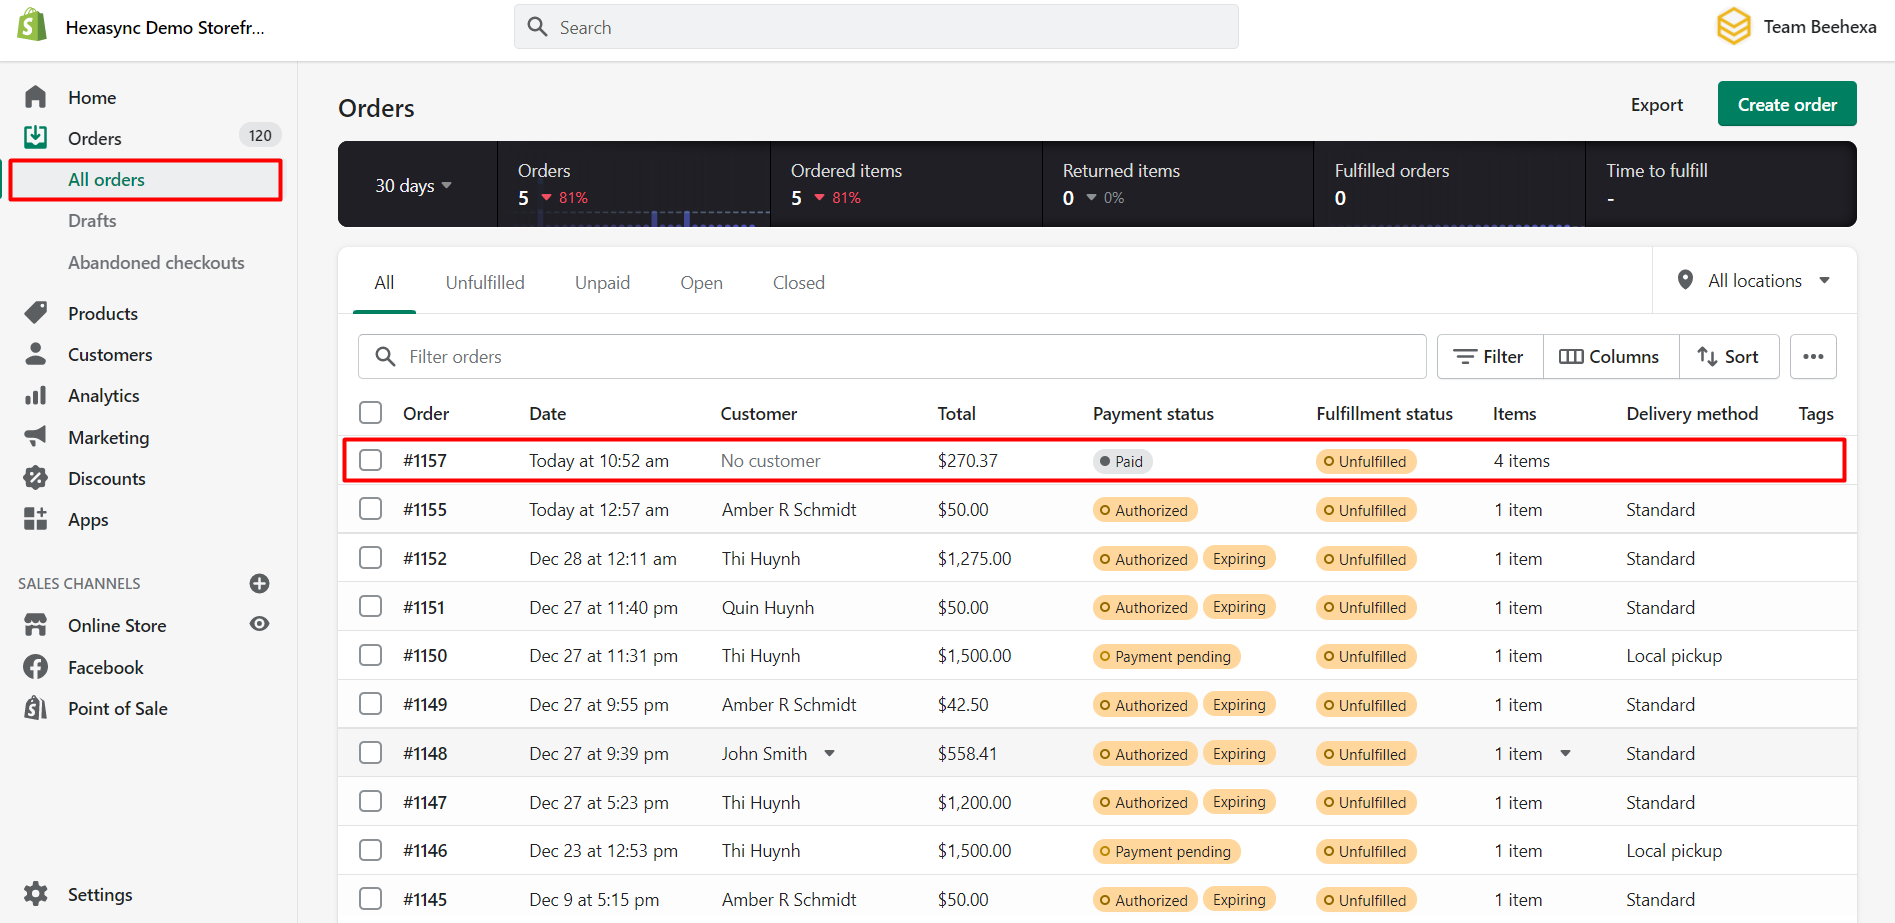
In the Shopify admin, go to Orders. The new order is at the top of the list.
Step 6: Fix common errors
The REST Admin API reference lists these status codes:
| Status | Meaning | What to check |
|---|---|---|
| 401 Unauthorized | The authentication credentials are missing or incorrect. | The X-Shopify-Access-Token header is present and spelled correctly, and the token is current (client credentials tokens expire after 24 hours). |
| 403 Forbidden | The request was refused, usually because the app lacks the required access scope. | The app has write_orders, the version with that scope is released, and the app is installed on the store. |
| 404 Not Found | The resource doesn’t exist. | The {shop} subdomain, the {api_version} and the path /orders.json. |
| 422 Unprocessable Entity | The request body is invalid: bad formatting, missing required fields or a logic error. | The body is valid JSON wrapped in "order", the body type is raw / JSON, and every variant_id exists in the store. |
| 429 Too Many Requests | The app hit the rate limit. | Wait the number of seconds in the Retry-After response header, then retry. |
GraphQL alternative: orderCreate
The same order can be created with the GraphQL Admin API’s orderCreate mutation. It requires the write_orders scope and is meant for orders that don’t go through checkout, such as orders imported from another system. In Postman, send a POST to https://{shop}.myshopify.com/admin/api/{api_version}/graphql.json with the same X-Shopify-Access-Token header and select GraphQL as the body type. New public apps must use GraphQL, so prefer it for anything beyond a quick test.
Video
The video below was recorded in 2022 with the old private-app setup. The request body and the order in the admin are the same; get the token and set the header as in Steps 1 and 2 above.
If you have any questions, comment below or browse more tutorials in our Devdocs.