In this article, we will talk about adjusts the inventory level of an inventory item at a location
What is the Inventory Level?
The Inventory level shows the available quantities of an item. Location, Inventory level, Inventory item, and product variant are closely related.
– A location will have many inventory levels.
– An item with just one inventory level in a location will have more than one with multiple locations.
– A product variant has just one inventory item.
You can see this diagram to understand more.

The order will affect the inventory level following this rule:
– When a Shopify-tracked product variant is included in an order, Shopify reduces the inventory for that variant. Because Shopify doesn’t know where the item will be fulfilled, it decreases the inventory level at the location with the lowest ID.
Because of this rule, Shopify has to take some actions to ensure the original location and other locations will match the inventory levels.
You can read this example for more overview:
I am the owner of the fashion store. My store has 3 warehouses to keep products.
– Texas (ID: 6854526841): 6 red shirts
– Florida (ID: 13668844615): 4 red shirts
– New York (ID: 5968834616): 7 red shirts
If a customer buys a redshirt through Shopify, Shopify automatically decreases the item’s inventory level in the lowest ID, in this case, the New York location.
– Texas (ID: 6854526841): 6 red shirts
– Florida (ID: 13668844615): 4 red shirts
– New York (ID: 5968834616): 6 red shirts
However, the order is delivered from Texas. The ID for the Texas location is included in the fulfillment when it is produced. When Shopify is compared, the inventory level between locations is not matched; they will increase the inventory level of items at the New York location and decrease the inventory level at the Texas location.
– Texas (ID: 6854526841): 5 red shirts
– Florida (ID: 13668844615): 4 red shirts
– New York (ID: 5968834616): 7 red shirts
Mistakes to avoid when adjusting the inventory level using Shopify API
When you adjust inventory levels using Postman in Shopify, you need to avoid a few mistakes, or else the call fails, and no response comes up.
Here are 2 common mistakes:
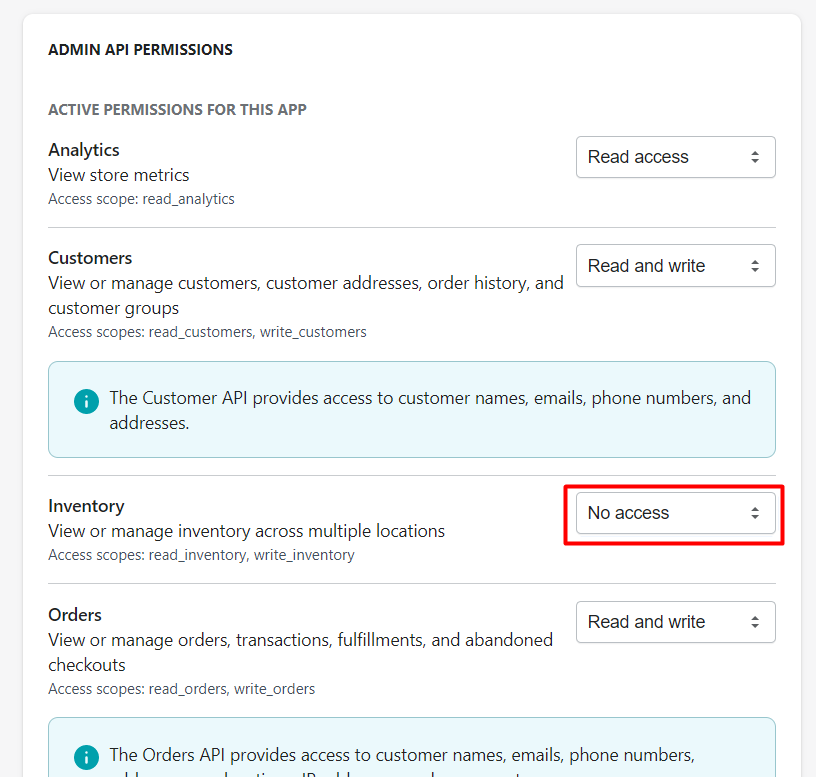
– Don’t activate inventory permission: This mistake will prevent the postman from accessing Shopify to make calls.
– Wrong calls: If you enter the wrong character or extra space, these are small errors that sometimes you don’t notice, leading to call failure.

How to adjust the inventory level of an inventory item at a location using Postman with Shopify API?
The process of adjusting the inventory level of an inventory item at a location includes 4 steps.
-
- 1: Generate API credentials from Shopify Admin
-
- 2: Get Location ID Using Postman
-
- 3: Get Inventory item ID using Postman
-
- 4: Adjust the inventory level of an inventory item at a location using Postman
Step 1: Generate API credentials from the Shopify admin
If this is the first time you make a call and don’t know how to use Postman, you must generate API credentials from the Shopify admin. Follow the process below.
-
- Log in to your Shopify admin
-
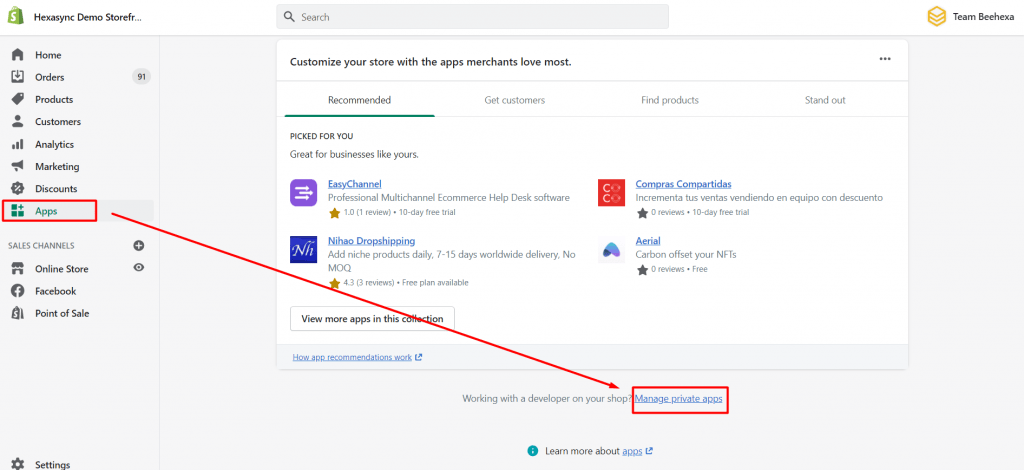
- Go to Apps – Develop apps for your store
-
- Click Create an app
-
- In the App details section, enter a name for your app, and an emergency developer email.
-
- In the Admin API section, select the areas of your store that you want the app to access.
-
- In this case, you need to activate the inventory permission. Scroll down to the admin API permissions and change the status from no access to read and write permissions.

-
- Click save
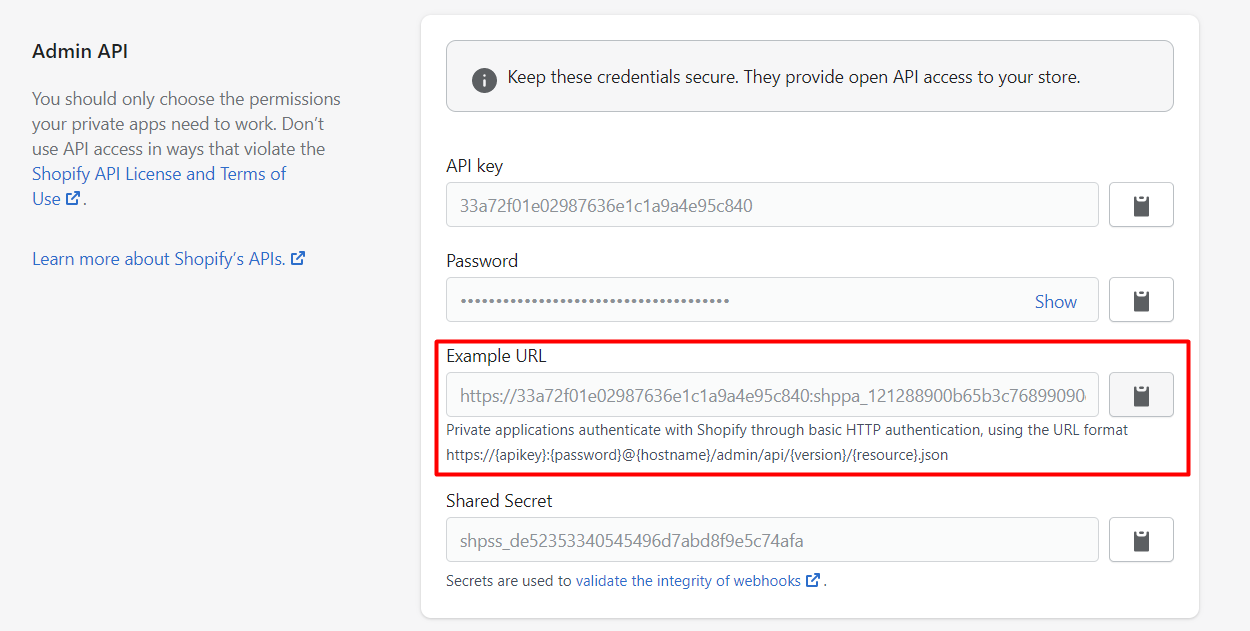
The Admin API section displays the app’s API key and password when you save the app’s details.
After that, we will get location_id, inventory_item_id to adjust the inventory level of an inventory item at a location.
Now, go to the product you want to adjust the inventory level. Scroll down to the variant area, and determine the product’s location name.
Example: Beehexa T-Shirt 2021 New Version 01 product. This product is available at 428 Dien Bien Phu, Ward 11, District 10 inventory.

These variations are available in all Inventories of Beehexa. But you choose one location where you want to adjust the inventory level. You need to remember the location name to use in the next step.
Step 2: Get the Location ID
We have to get the location id because when adjusting the inventory level in the Postman command, we have to enter the code, including the location id.
Now, we will get location_id.
-
- Log in to your Postman and create a new workspace
-
- Create a new GET with this URL:
https://{username}:{password}@{shop}.myshopify.com/admin/api/{api-version}/{resource}.json
-
- {username} – The API key that you generated.
-
- {password} – The API password that you generated.
-
- {shop} – The name of your development store.
-
- {api-version} – The supported API version that you want to use.
-
- {resource} – A resource endpoint from the REST Admin API.
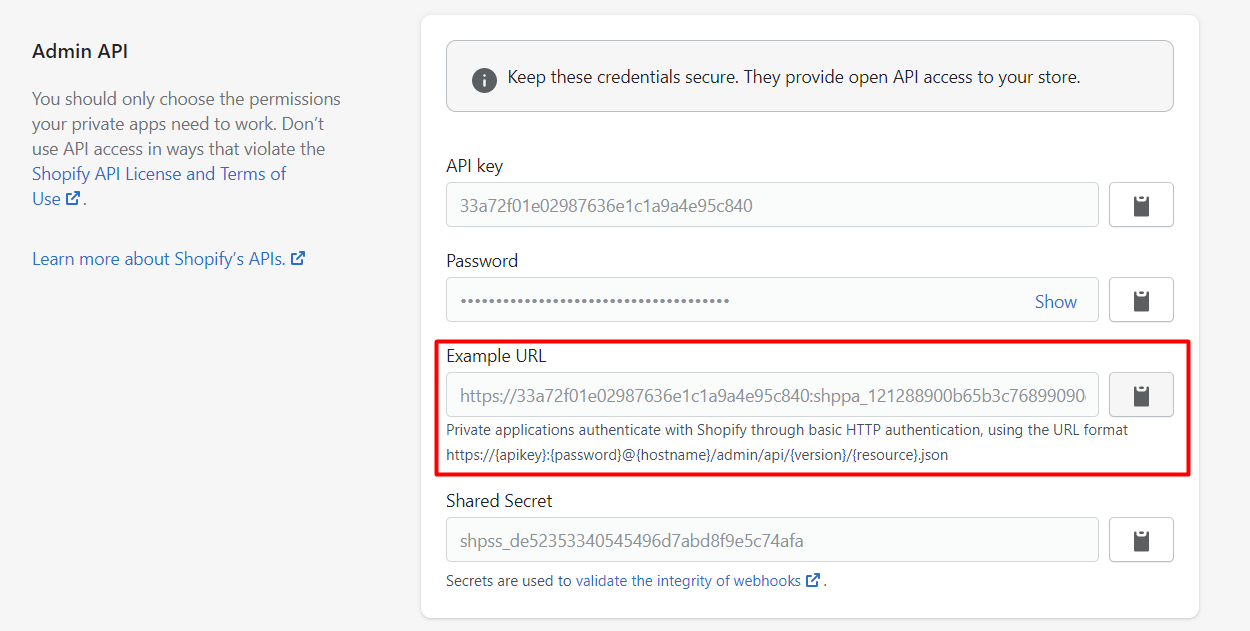
Or you can copy this example in the Shopify Admin, and remember to change {resource} to {locations}:
https://33a72f01e02987636e1c1a9a4e95c840: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@hexasync.myshopify.com/admin/api/2022-01/locations.json
-
- Paste the URL above.

Then click Send
Response:
The API will return all location information.
{
    "locations": [
        {
            "id": 34772975679,
            "name": "428 Dien Bien Phu Ward 11 District 10",
            "address1": "428 Dien Bien Phu Ward 11 District 10",
            "address2": "",
            "city": "Ho Chi Minh City",
            "zip": "700000",
            "province": null,
            "country": "VN",
            "phone": "0978711217",
            "created_at": "2019-11-10T00:09:22+09:00",
            "updated_at": "2019-11-10T00:09:22+09:00",
            "country_code": "VN",
            "country_name": "Vietnam",
            "province_code": null,
            "legacy": false,
            "active": true,
            "admin_graphql_api_id": "gid://shopify/Location/34772975679",
            "localized_country_name": "Vietnam",
            "localized_province_name": null
        },
        {
            "id": 60939796543,
            "name": "General Warehouse",
            "address1": "",
            "address2": "",
            "city": "",
            "zip": "2060",
            "province": "New South Wales",
            "country": "AU",
            "phone": "+61",
            "created_at": "2021-11-05T13:56:52+09:00",
            "updated_at": "2021-11-05T13:57:51+09:00",
            "country_code": "AU",
            "country_name": "Australia",
            "province_code": "NSW",
            "legacy": false,
            "active": true,
            "admin_graphql_api_id": "gid://shopify/Location/60939796543",
            "localized_country_name": "Australia",
            "localized_province_name": "New South Wales"
        },
        {
            "id": 60896116799,
            "name": "Q1",
            "address1": "02 Hai Trieu Ben Nghe Ward, District 1 Ho Chi Minh City",
            "address2": "Bitexco",
            "city": "",
            "zip": "700000",
            "province": "",
            "country": "VN",
            "phone": "",
            "created_at": "2021-03-17T11:57:12+09:00",
            "updated_at": "2021-03-17T11:57:52+09:00",
            "country_code": "VN",
            "country_name": "Vietnam",
            "province_code": null,
            "legacy": false,
            "active": true,
            "admin_graphql_api_id": "gid://shopify/Location/60896116799",
            "localized_country_name": "Vietnam",
            "localized_province_name": null
        },
        {
            "id": 60896149567,
            "name": "Q2",
            "address1": "71 Bùi Tá Hán Phuong An Phu Quan 2",
            "address2": "Desworking",
            "city": "Ho Chi Minh City",
            "zip": "7000000",
            "province": null,
            "country": "VN",
            "phone": "",
            "created_at": "2021-03-17T11:59:04+09:00",
            "updated_at": "2021-03-17T11:59:32+09:00",
            "country_code": "VN",
            "country_name": "Vietnam",
            "province_code": null,
            "legacy": false,
            "active": true,
            "admin_graphql_api_id": "gid://shopify/Location/60896149567",
            "localized_country_name": "Vietnam",
            "localized_province_name": null
        }
    ]
}
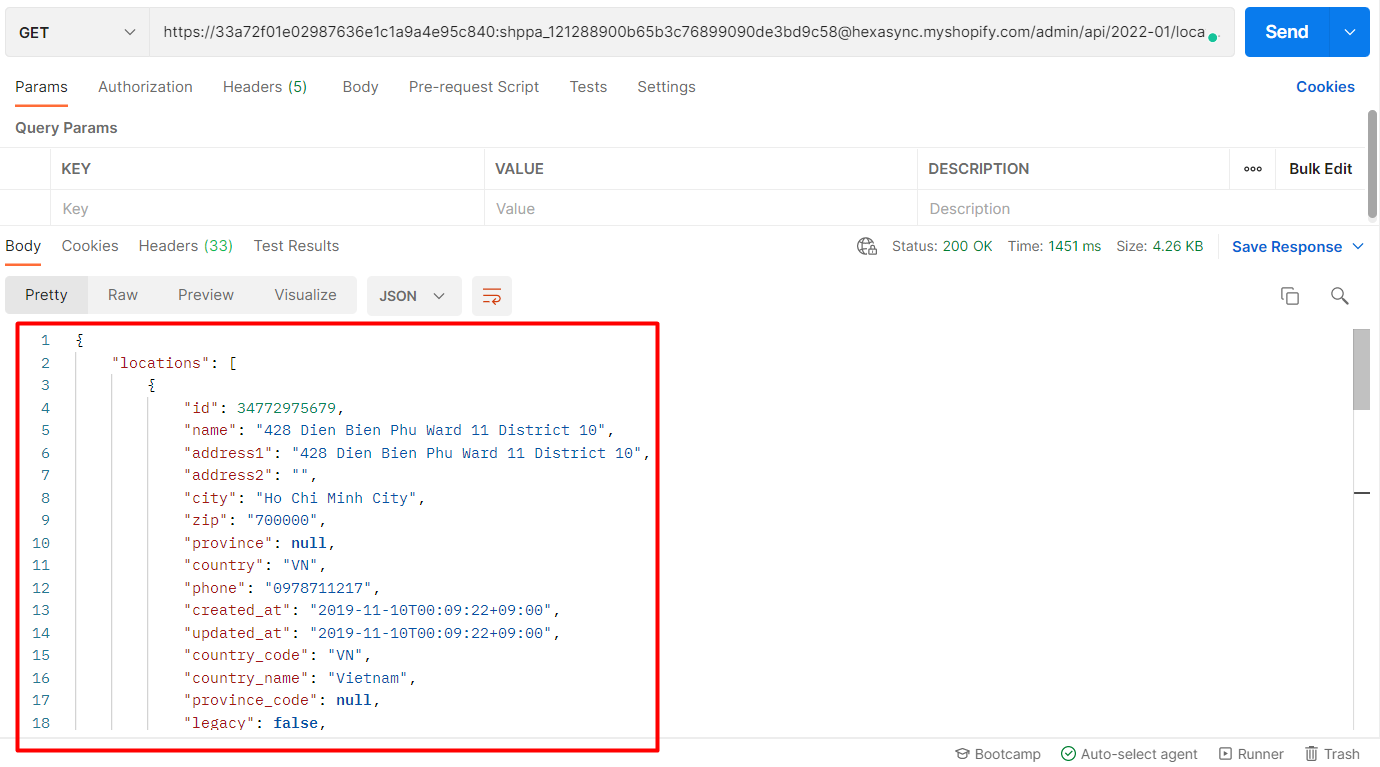
Now, we have location_id= 34772975679 of 428 Dien Bien Phu, Ward 11, District 10 inventory.
Step 3: Get Inventory Item ID
However, the call to get the inventory item ID includes the product variant id, so we need to collect the product variant id first with these steps:
– In the admin, choose products, click all products
– Choose the product that you want to get variant id
– Scroll down to the variant area, click on the variant you want to collect the variant id
– Finally, copy the id of the product variant in the URL.
Product Variant _id=33320656601151
Now we will get inventory item ID using Postman:
-
- Log in to your Postman and create a new workspace
-
- Create a new GET with this URL:
https://{username}:{password}@{shop}.myshopify.com/admin/api/{api-version}/{resource}.json
-
- {username} – The API key that you generated.
-
- {password} – The API password that you generated.
-
- {shop} – The name of your development store.
-
- {api-version} – The supported API version that you want to use.
-
- {resource} – A resource endpoint from the REST Admin API.
Or you can copy this example in the Shopify Admin, remember to change {resource} to {variants/variants_id}:
https://33a72f01e02987636e1c1a9a4e95c840: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@hexasync.myshopify.com/admin/api/2022-01/variants/33320656601151.json
Paste the URL above.

Then click Send
Response:
The API will return all information about a product variant.
{
    "variant": {
        "id": 33320656601151,
        "product_id": 4916307230783,
        "title": "Default Title",
        "price": "135.00",
        "sku": "1003",
        "position": 1,
        "inventory_policy": "deny",
        "compare_at_price": null,
        "fulfillment_service": "manual",
        "inventory_management": "shopify",
        "option1": "Default Title",
        "option2": null,
        "option3": null,
        "created_at": "2021-01-15T17:38:09+09:00",
        "updated_at": "2021-01-15T17:38:09+09:00",
        "taxable": true,
        "barcode": null,
        "grams": 0,
        "image_id": null,
        "weight": 0.0,
        "weight_unit": "kg",
        "inventory_item_id": 35484570255423,
        "inventory_quantity": 0,
        "old_inventory_quantity": 0,
        "requires_shipping": true,
        "admin_graphql_api_id": "gid://shopify/ProductVariant/33320656601151"
    }
}
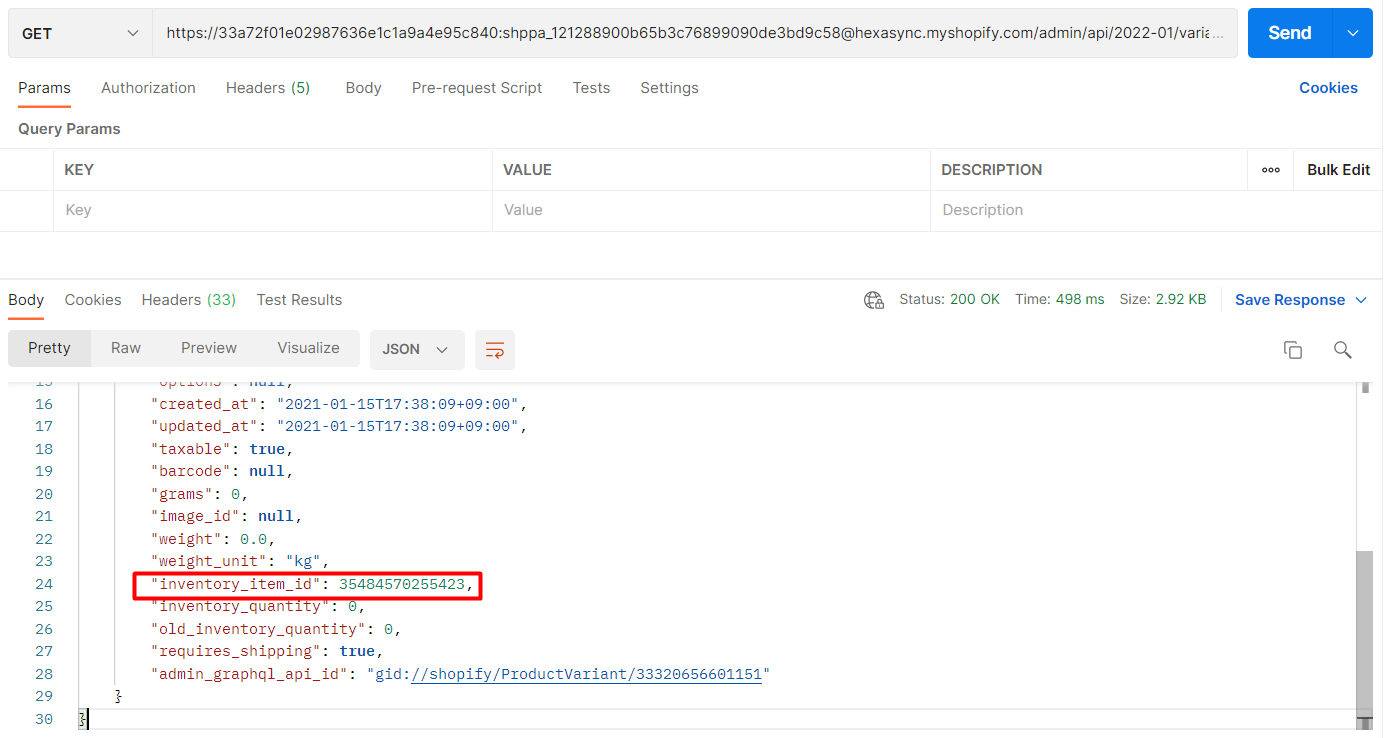
Now, we have inventory item_id= 35484570255423 Of the product variant.
Step 4: Adjusts The Inventory Level Of An Inventory Item At A Location
Now we are all ready to get inventory level ID using Postman.
Adjust the inventory level of an inventory item at a location using Postman
-
- Log in to your Postman and create a new workspace
-
- Create a new POST with this URL:
https://{username}:{password}@{shop}.myshopify.com/admin/api/{api-version}/{resource}.json
-
- {username} – The API key that you generated.
-
- {password} – The API password that you generated.
-
- {shop} – The name of your development store.
-
- {api-version} – The supported API version that you want to use.
-
- {resource} – A resource endpoint from the REST Admin API.
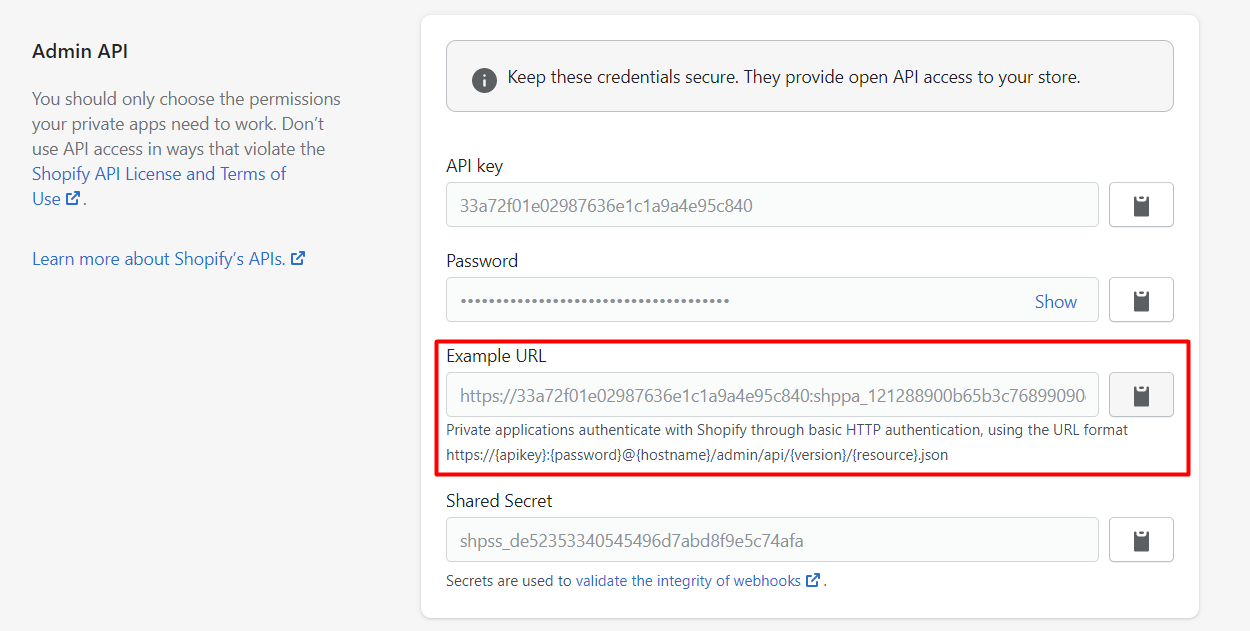
Or you can copy this example in the Shopify Admin, remember to change {resource} to {inventory_levels/adjust}:
https://33a72f01e02987636e1c1a9a4e95c840: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@hexasync.myshopify.com/admin/api/2022-01/inventory_levels/adjust.json
-
- Paste the URL above.
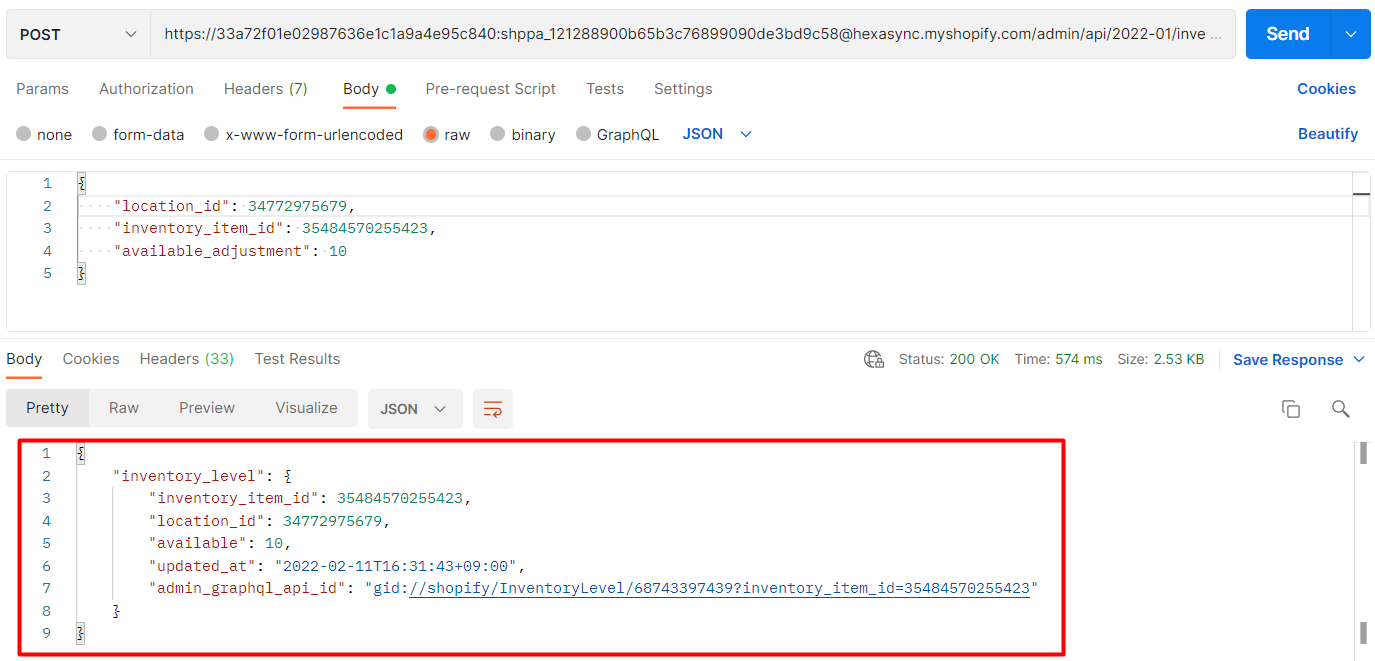
In the body section, click raw → Choose JSON, then enter the code.
{
    "location_id": 34772975679,
    "inventory_item_id": 35484570255423,
    "available_adjustment": 10
}

Then click Send
Response:
The API will return the data like this.
{
    "inventory_level": {
        "inventory_item_id": 35484570255423,
        "location_id": 34772975679,
        "available": 10,
        "updated_at": "2022-02-11T16:31:43+09:00",
        "admin_graphql_api_id": "gid://shopify/InventoryLevel/68743397439?inventory_item_id=35484570255423"
    }
}
Verify the result
– In the admin, choose products, click all products
– Then search the Beehexa T-Shirt 2021 New Version 01 product
– Scroll down to the variant area, click on the variant you adjusted the inventory level
– Scroll down to the inventory area, then look at the available quantity
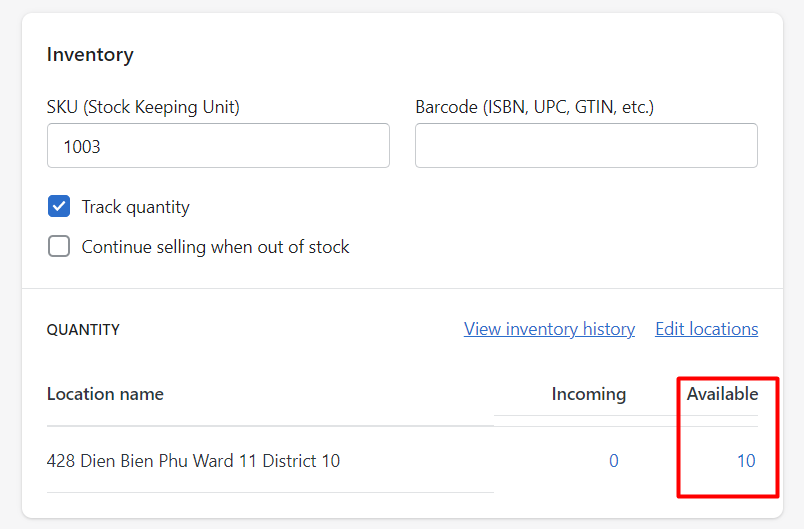
As you can see, the inventory level has been adjusted successfully.
Hexasync
Above are the steps you need to know to adjust inventory levels, but this will be easy to do with 1 selling channel. And choosing eCommerce for inventory management. So the management of the inventory has many limitations.
If you sell multiple channels, you need an inventory management system to create, update, or delete any inventory-related information easily.
Thanks to Hexasync, you can integrate any inventory management parameter from the system to all sales channels instead of using the Shopify API and making multiple commands on the Postman.
Hexasync will save your business a lot of resources from time to money, and you can completely customize Hexasync’s integration solutions to suit your business.
Final words
Above are all steps to adjust the inventory level of an inventory item at a location using Postman with Shopify API. Please comment below or refer to our Shopify API documentation if you have any questions.
If you still do not understand the tutorial’s content, you can watch the video below for a more overview.
Hopefully, you can do it!