HexaSync Overview
HexaSync is an Integration Platform as a Service (iPaaS), which is a suite of cloud services enabling the development, execution, and governance of integration flows connecting any combination of On-premises and Cloud-based processes, services, applications, and data within individuals or across multiple organizations.
HexaSync works as a middleware to pull and push data back and forth between or among 2 or many systems. The data will be synchronized depending on users’ choices with each system’s API permissions.
What if it is a legacy system? One of the advantages of HexaSync is that it can play well with API and non-API applications. It does not matter whether a business owner uses a modern platform or old software; HexaSync still enables them to automate their business processes with integration.
Registering a HexaSync Profile
Please make sure you have an available HexaSync Profile and invite Beehexa Development Team to support your deployment process.
Step 1: Create a HexaSync Account using your email address
- Visiting link: https://app-az.hexasync.com/login
- Sign up for an account by entering your email address and clicking “Login”. Or you can also sign up with Microsoft or Google.
- Fill in the information, including the name and company name.
- OTP code will be sent to email. Copy that OTP code here and click “Submit“. So you have successfully registered an account on HexaSync.
Step 2: Create a HexaSync Profile
- After successful account registration, the screen will appear like this.
- To create a new profile, click this button.
- Choose Source System and Destination System according to your synchronization needs.
- Click OK, and you have successfully created a HexaSync Profile.
- If you need more than one HexaSync Profile, repeat the same steps above with the remaining HexaSync Profiles.
Step 3: Invite team@www.beehexa.com to collaborate with your HexaSync Profile
- Select HexaSync Profile you want to share
- Invite our team to manage your integration following the instructions in the image below.
Authorize HexaSync to access your Wix Store
Step 1: Checking HexaSync App Invitation
By visiting this link http://wix.to/c8t2x00, the screen below will pop up.
Step 2: Select your Wix Store to use HexaSync App
Step 3: Allow HexaSync to use your Wix Store API
After clicking the button and waiting for seconds, Wix will redirect you to app.hexasync.com.
Step 4: Verifying that HexaSync is installed on your store
Sharing Microsoft Dynamics API to HexaSync
Step 1: Install the Hexasync app for your tenant
- From Home – Microsoft Azure, go to Azure Active Directory.
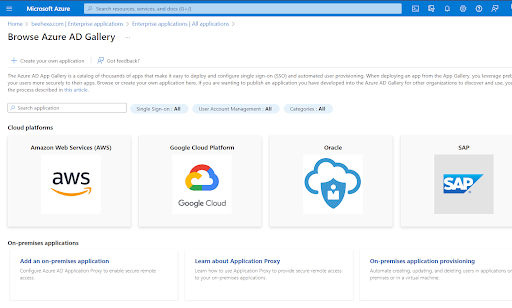
- Then go to Enterprise Applications, and click on New Application to access Azure AD Gallery.
- The screen will pop up below.

- Search for the HexaSync app and sign up.
- Sign up or Sign in to a Hexasync account by using Microsoft single sign-on
Step 2: Add HexaSync to your Dynamics Finance & Operations site
- Return to your Enterprise Applications page; you’ll have the HEXASYNC app on your list; click on the app name to get the Application ID.
- On your Microsoft Dynamics F&O site, search for the Azure Active Directory Applications page.
- On the Azure Active Directory Applications page, create a new record by clicking on the New button, then put the Application ID to the Client Id field, and on the User ID field, select the proper admin user, finally, click save to get the process done.
Step 3: Review Dynamics Finance & Operations API access
- Please follow up on our Microsoft Tutorials: How To Generate An Access Token In Azure Active Directory to ensure HexaSync can access your Microsoft Finance and Operations instance using Access Token.
- On the Microsoft Dynamics F&O dashboard, search Azure Active Directory Applications.
- Click on the New button.
- Add information including Client Id, Name, and User ID, then select Save.
- After reloading the page, move to Microsoft Azure Page to check Client ID; as you can see, we have successfully authorized HexaSync Application to work with Dynamics F&O.
- Go to Postman to generate the access token. First of all, create a new environment.
- Fill in all information needed on the variable column and initial value column. After that, click on Save.
- Set active for it
- Create a new post with the URL
- In the Body section, click on “form URL encoded”.
- After that, enter the set of keys and values like this code below and choose Send.
- The postman will return the access token of your Microsoft Dynamics F&O. So, the access token on Azure Active Directory has been successfully generated.
The above are all the steps to set up Microsoft Dynamics FO and Wix Integration. Hopefully, you can follow it easily.
