Connecting your online store to your back-office ERP system is no longer a luxury — it’s a necessity for growth, accuracy, and operational efficiency. If you’re running your store on Shopify and managing finance, inventory, and operations in Microsoft Dynamics 365 Business Central, you’re in luck. Microsoft offers an official Shopify Business Central integration via the Shopify Connector app.
This guide walks you through the process of integrating Shopify with Business Central using Microsoft’s native tool, complete with step-by-step instructions, official resources, and key considerations.
1. Why Integrate Shopify with Business Central?
Integrating Shopify and Business Central gives you:
- Automated sync of products, inventory, orders, customers, and payments
- Real-time visibility into sales and financials
- Reduced manual data entry and errors
- Better scalability across sales channels
With Microsoft’s official Shopify Business Central integration, you can streamline your ecommerce and ERP workflows into a unified system.
🔗 Official Resources
- Microsoft Docs: Shopify Connector Overview
- AppSource: Shopify Connector App
- Shopify Help Center: Shopify Settings Guide
2. Prerequisites
Before setting up your Shopify Business Central integration, make sure you have:
Shopify:
- A live or trial Shopify store (get free trial)
- Admin access to install apps
Business Central:
- Business Central Online (Connector is not supported for on-premises versions)
- Admin permissions to install apps and configure environments
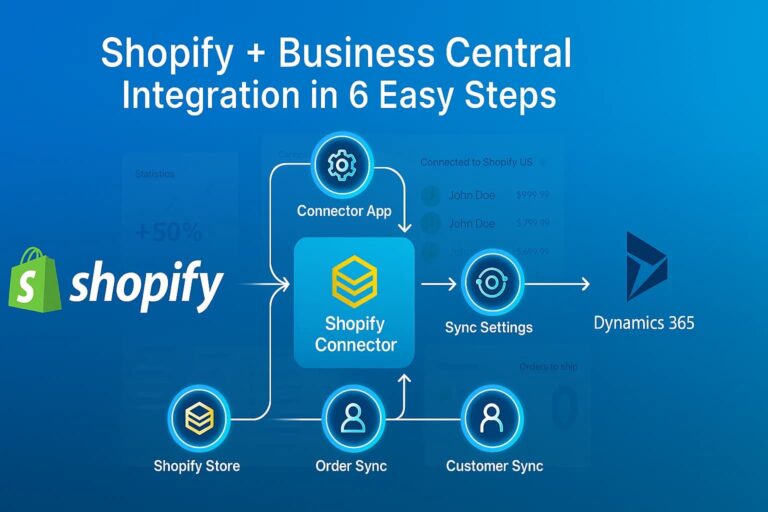
3. Step-by-Step: Shopify Business Central Integration
🔹 Step 1: Install the Shopify Connector
- Go to AppSource
- Click Get it now
- Open Business Central, search for “Shopify Shops” in the Tell Me menu.
🔍 Tip: New Business Central trial tenants already have the Shopify Connector pre-installed.
🔹 Step 2: Connect Your Shopify Store
- In Business Central, search for “Shopify Shops” and select the related link.
- Click New to create a new shop.
- Enter a code (e.g.,
MYSHOP) and the full Shopify URL (e.g.,https://myshop.myshopify.com) - Activate the Enabled toggle: and review/accept the terms and conditions.
- Test the connection: After creating the Shopify Shop, click Action > Access > Request Access.

🔹 Step 3: Configure Sync Setting
Inside the Shopify Shop Card, configure sync settings:

| Setting |
|---|
| Turn off the Allow Background Syncs toggle. |
| Select To Shopify in the Sync Item field. |
| Select To Shopify in the Sync Item Images field. |
| Turn on the Sync Item Attributes toggle. |
| Turn on the Inventory Tracked toggle. |
| Select Deny in the Default Inventory Policy field. |
| Turn on the Auto Create Unknown Customers toggle. |
| Fill in the Customer/Company Template Code field with the appropriate template. |
| Fill in the Shipping Cost Account, the Tip Account with the revenue account. For example, in the US, use 40210. |
| Turn on the Auto Create Orders toggle. |
| Turn off the Auto Release Sales Orders toggle. |
These settings determine what data flows between systems and in which direction.
🔗 Learn more: Connect Business Central to the Shopify shop
🔹 Step 4: Sync Products from Business Central to Shopify
- Go to Shopify Products
- Click Add Items
- Apply item filters (e.g., by category)
- Enable options: Sync Product Images, Sync Inventory
- Click OK to begin syncing
🔗 Learn more: Sync Items and Inventory – Microsoft Docs
🔹 Step 5: Sync Shopify Orders to Business Central
- Navigate to Shopify Orders
- Click Sync Orders from Shopify
- Orders will be imported and converted into Sales Orders or Sales Invoices depending on their fulfillment status
🔗 Guide: Sync Sales Orders – Microsoft Docs
🔹 Step 6: Sync Customer
- Go to Shopify Customers
- Click Sync Customers
- Shopify customers will be imported and either matched to existing customers or created as new records in Business Central
🔗 Read more: Sync Customers and Companies
4. Important Limitations to Consider
While Shopify Business Central integration using the Shopify Connector is powerful, it’s important to understand its limitations:
- ❌ Only available for Business Central Online
- ❌ No support for draft orders or Shopify Markets (multi-region pricing)
- ❌ Basic mapping logic; does not support advanced rules, bundles, or metafield automation
- ❌ Single-shop limitation (not ideal for multi-storefront businesses)
For more advanced scenarios, consider using an integration platform like HexaSync to handle:
- Multi-store connections
- Custom rules and transformations
- Extended metafield and bundle logic
5. Conclusion
If you’re looking for a native, low-code way to connect your Shopify store with Microsoft Dynamics 365 Business Central, the Shopify Connector from Microsoft is a solid option. It supports most essential ecommerce operations and is backed by Microsoft’s ecosystem.
However, for businesses with more complex workflows, multi-location operations, or B2B-specific needs, this solution may fall short.
Stay tuned — in our next post, we’ll compare Microsoft’s Shopify Connector with the HexaSync Profile to help you decide which integration approach is best for your business.